 0 -1  0    -1 -1 -1
-1  4 -1 or -1  8 -1
 0 -1  0    -1 -1 -1

 I forget which, it was a *long* time ago, think it was in the "Orange Book" OpenGL Shading Language 2nd ed
1 / 54
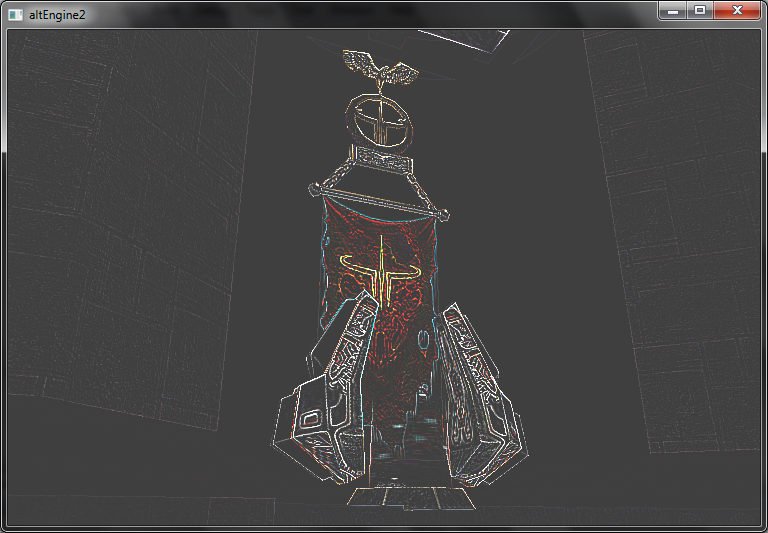
Quake3 bsp rendered with laplacian edge detection. I think it looks cool... It is essentially just a 3x3 kernel filter, think something like:
2 / 54
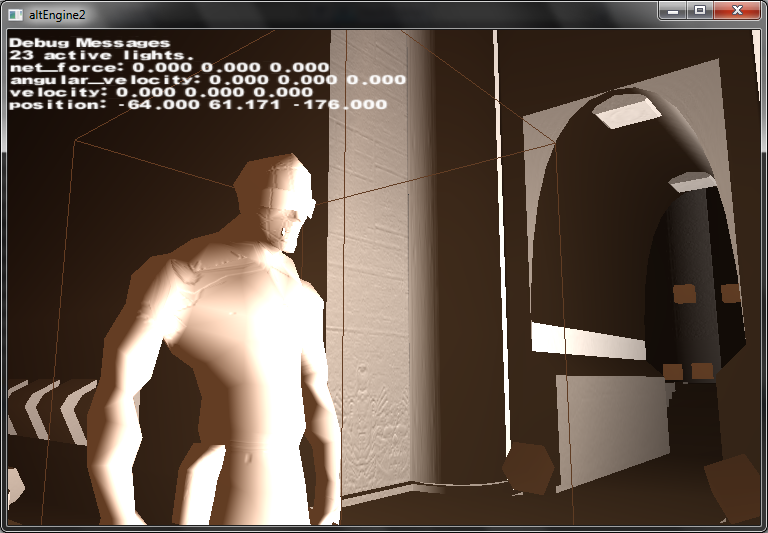
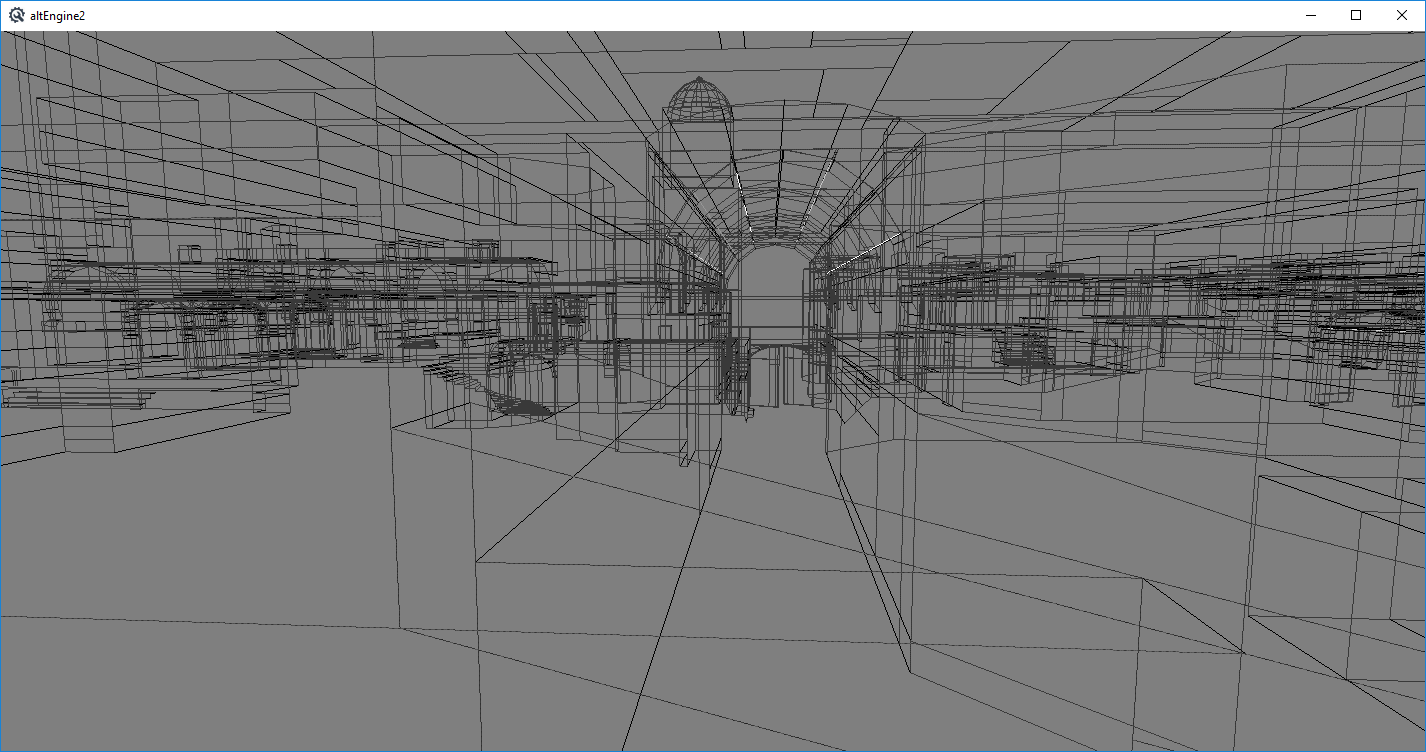
Random screenshot I thought looked cool, wavefront obj model rendered with phong lighting and normal maps, no
textures. (yes, the normal of the last row of the bezier curved archway is pointing the wrong direction. It's fixed now.)
textures. (yes, the normal of the last row of the bezier curved archway is pointing the wrong direction. It's fixed now.)
3 / 54

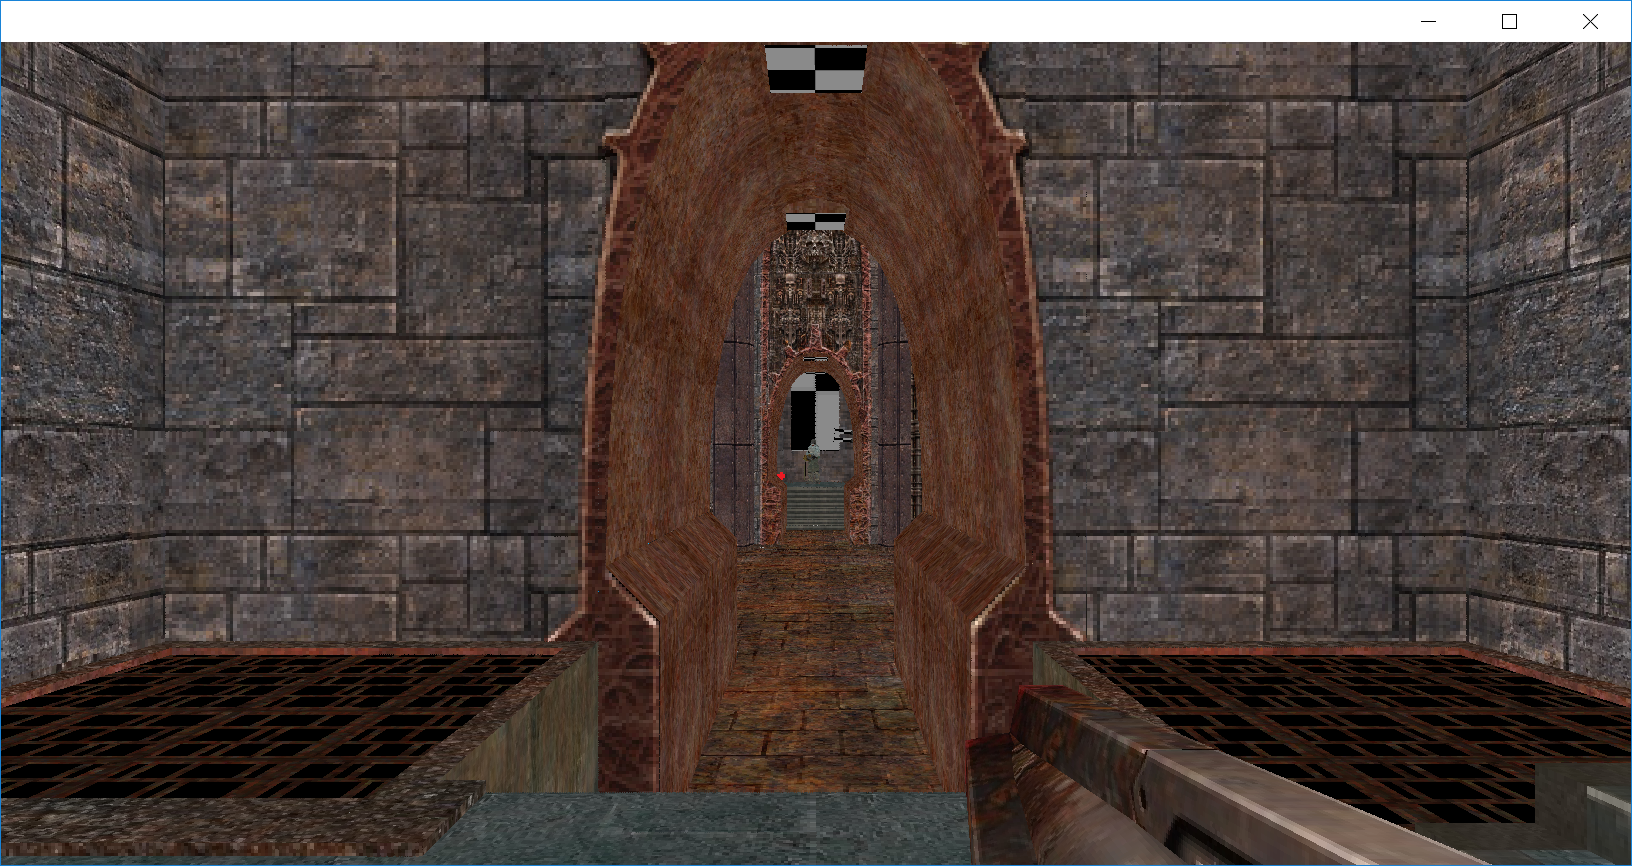
Parallax Mapping with Offset Limiting, needs work, my tangent space matrix is probably not quite right, I'll implement
self shadowing via Tatarchuk's method when I have time.
self shadowing via Tatarchuk's method when I have time.
4 / 54
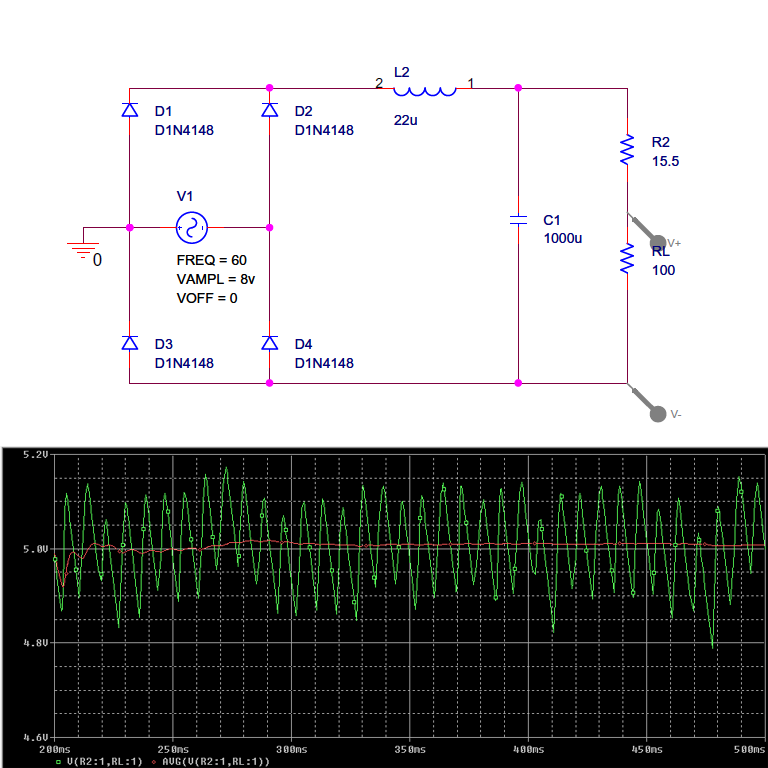
AC to DC converter... 5v dc out with (hopefully) minimal ripple given constraints.
5 / 54
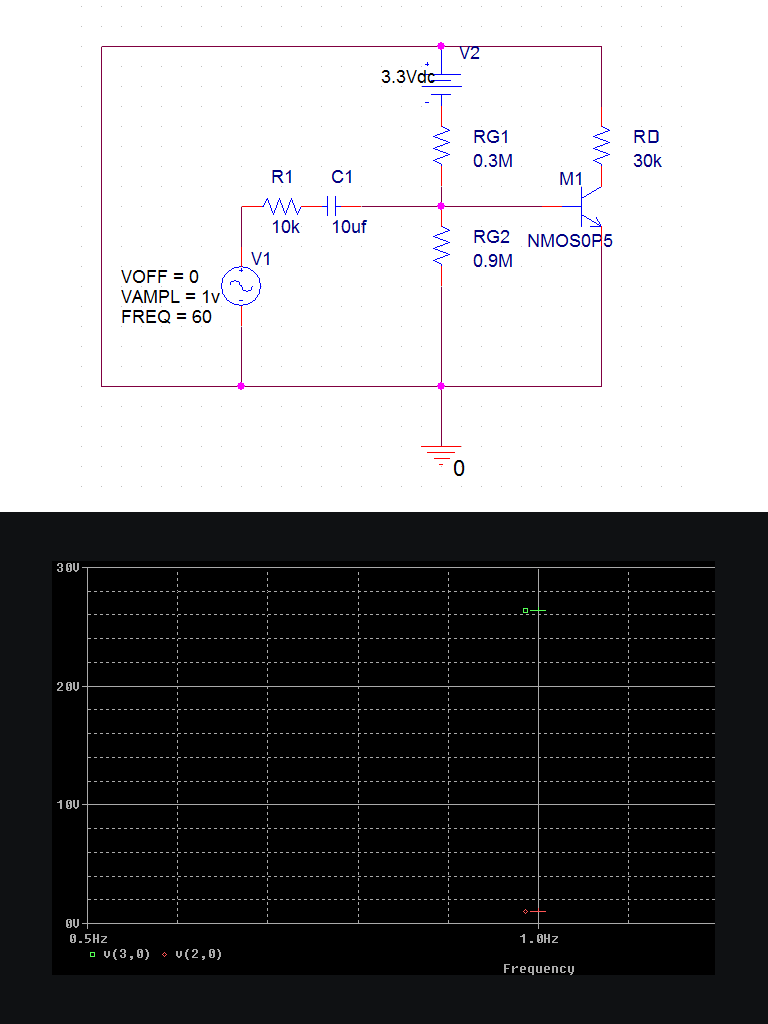
Common Source Mosfet Amplifier operating in saturation region. I lost the values for the resistors so it isnt doing the
50V/V amplification it should be doing, but it works. (red is small signal input, green is output voltage)
50V/V amplification it should be doing, but it works. (red is small signal input, green is output voltage)
6 / 54
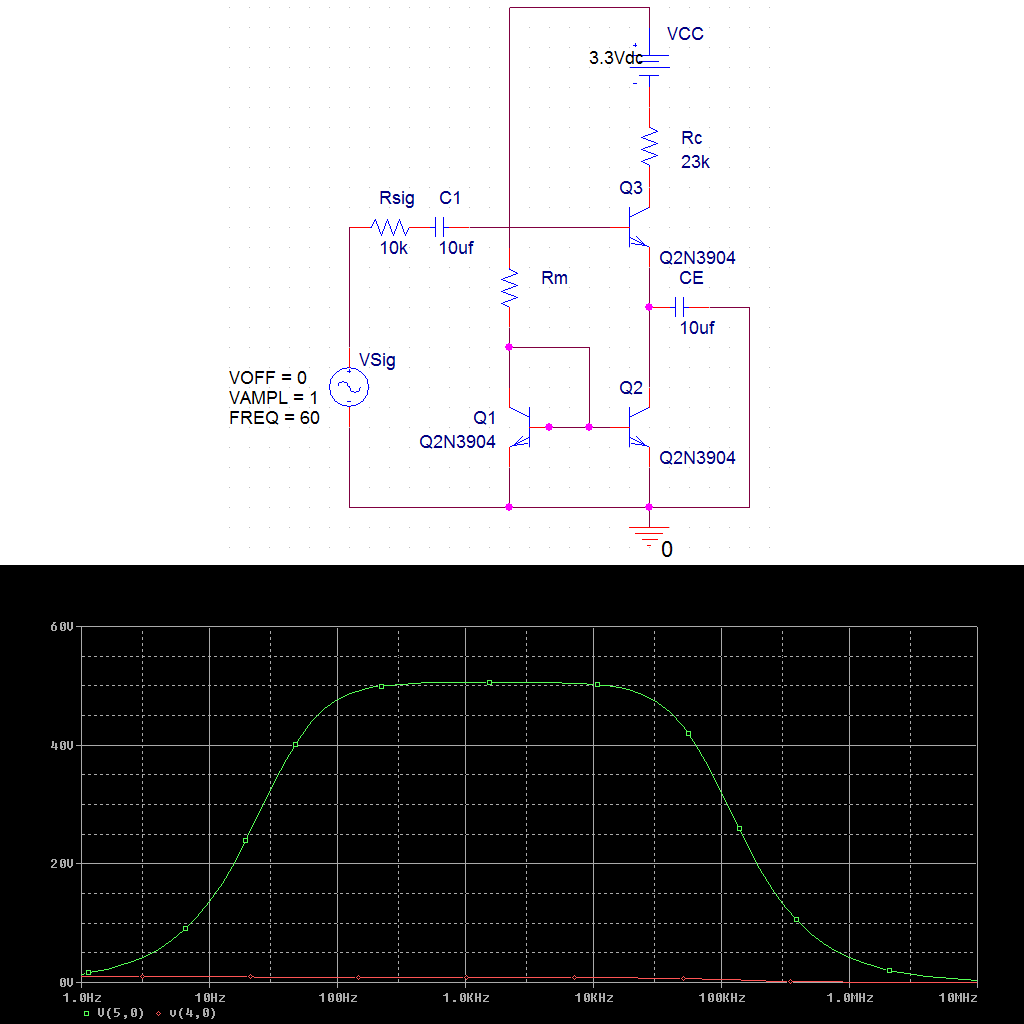
Common Emitter BJT amplifier that is amplifying like it is suppose to. The two extra bjt's on the bottom are a current mirror.
7 / 54
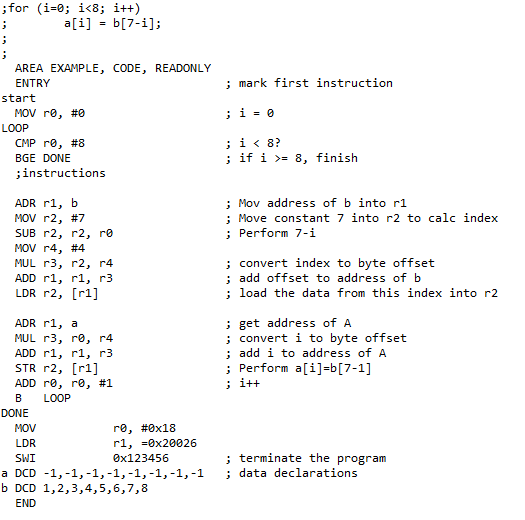
Just in case you ever needed an ARM assembly code example. This works in codewarrior, be careful as it is picky about whitespace.
8 / 54

That's a one spicy metaball. (it looks better in motion, download the example) Made this the other day after reading
about marching cubes for the millionth time. Finally decided to write it up. Surprisingly easy to code given the tables
that *everyone* uses: http://paulbourke.net/geometry/polygonise/
Download my example code here: mcubes.zip
about marching cubes for the millionth time. Finally decided to write it up. Surprisingly easy to code given the tables
that *everyone* uses: http://paulbourke.net/geometry/polygonise/
Download my example code here: mcubes.zip
9 / 54
Decided to use md5 files as animated models in my engine, here it is right after crudely putting it in from a side project.
The guy looks better animated. I still need to ensure vertex normals are correct and generate tangents. Used this site's
(http://tfc.duke.free.fr) example, but rewrote all code to my liking. Videos: part1 part2
The guy looks better animated. I still need to ensure vertex normals are correct and generate tangents. Used this site's
(http://tfc.duke.free.fr) example, but rewrote all code to my liking. Videos: part1 part2
10 / 54

This isnt all that impressive, but it is the correct output of some line drawing code eg: draw_line(x1,y1,x2,y2). Kind of annoying to get all the special cases correct. Lots of integer slope y / x code, unless it's better to do x / y, symmetry says you can use the same code for upper right as rest of the quadrants, so negate axis and reuse code etc. There are two main algorithms for line drawing, DDA and Bresenham's line algorithm. Here's a DDA version and a Bresenham version -- Looking back at what I did compared to the other algorithms it looks like a dda algorithm except I probably could have optimized the increment as a running sum since it remains constant. But man, sometimes you just want to draw a line. -- Here is the EVGALine version from Michael Abrash's Black Book that is a Bresham line algorithm that handles all the quadrants etc and is probably the best you can get short of assembly optimization or vectorization for straight lines
11 / 54
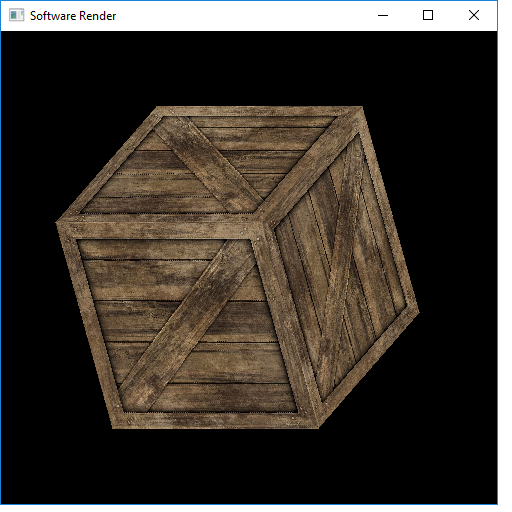
Software rendered cube with affine texture mapping and barycentric triangle rasterization software3.zip
12 / 54

I'm just going to explain bitcoin because I think it's cool.
Bitcoin is a decentralized digital currency that is completely anonymous. You can send and receive payments online without a middleman. Sort of like paypal without the paypal if that makes any sense.
How do you use it?
Bitcoin is a decentralized digital currency that is completely anonymous. You can send and receive payments online without a middleman. Sort of like paypal without the paypal if that makes any sense.
How do you use it?
- Well first you need a wallet, which is a private/public key pair used to idenitfy your account on the network. (think of it as a bank account) You create a wallet using software that you can download from bitcoin.org, look for bitcoin-qt.
- So now you need bitcoins
- You can get them by the traditional means of selling goods or services and accepting payments to your public address which is just a string of random numbers and letters. As an example my bitcoin wallet public address is: 18EHKKRn31FjveaukvRuUv7wnyVrcei6dm (feel free to give me money)
- Another easy way would be to exchange cash for bitcoins at an online exchange like you would do to convert any one currency to another. (Which is also how you would convert bitcoins back into dollars)
- And the last way is by mining. (Which is why there are any bitcoins to buy to begin with)
Bitcoin mining is the process of creating SHA-256 hashes of some data until you get a hash that is less than a certain number.
- The data is called a block, which is composed of recent transactions, and that certain number is set by the network to control the growth rate of bitcoins such that no more than 21 million are created in total over the next hundred years.
- The first person to create the hash gets 50 bitcoins.
- Every four years this value halves Eg: You only get 25 bitcoins starting Jan 1st of 2013.
- Most people hash in groups and split the 50 bitcoins as it takes a long time to find the magic hash that is less than the given number.
- When you finish with one block, you add it to the blockchain, which is where you keep all the old blocks.
- This block chain is shared peer to peer style with every mining node on the network and has every transaction that has ever occurred stored in it . (This means that at any point in time you can check how much money a certain public key wallet has in it) http://blockexplorer.com/address/18EHKKRn31FjveaukvRuUv7wnyVrcei6dm
13 / 54
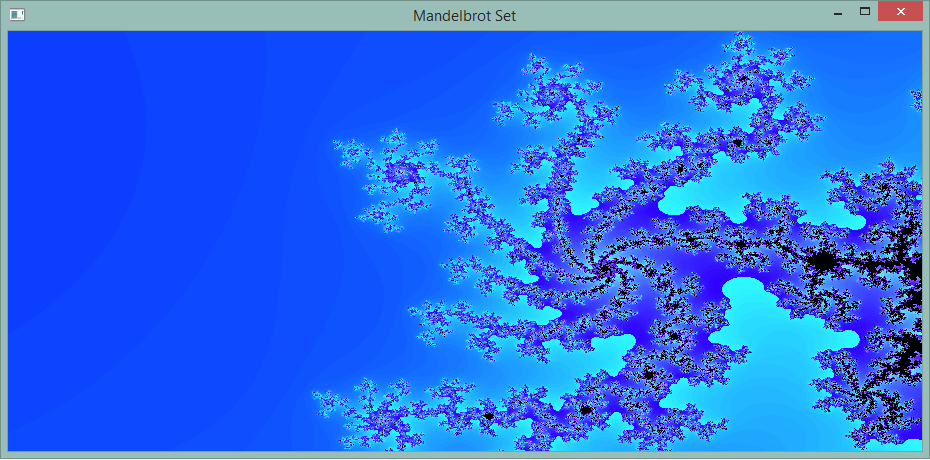
Mandelbrot set generator because why not. Pretty much is a set of random numbers generated on the complex plane that look pretty and have infinite edge detail. mandelbrot.zip
14 / 54

Simple ray tracer based on codermind example, renders three spheres very slowly raytrace.zip
15 / 54
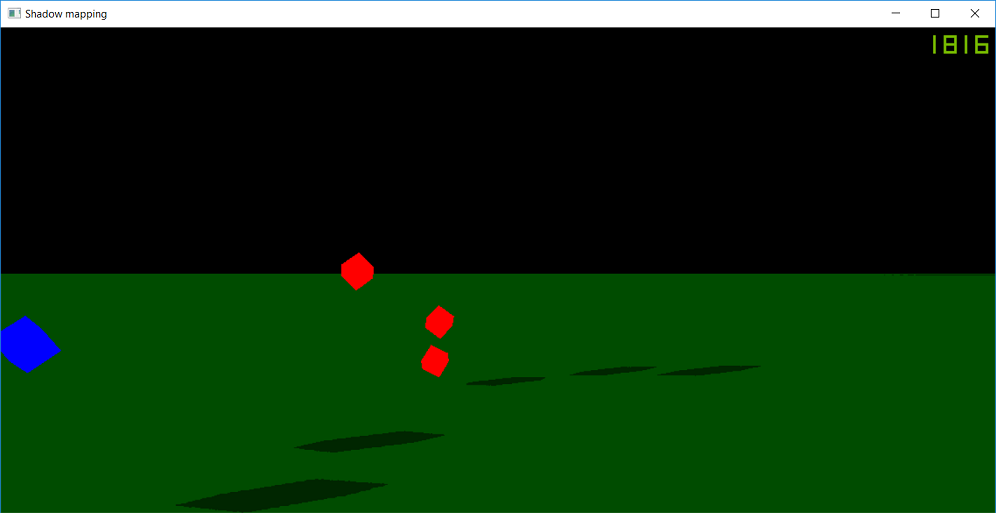
Was having an issue adding omnidirectional shadowmaps to my engine so I needed to make a basic shadow mapping demo to iron out issues, here is the demo: shadowmap.zip, used http://www.fabiensanglard.net/shadowmapping/ as an example.
16 / 54
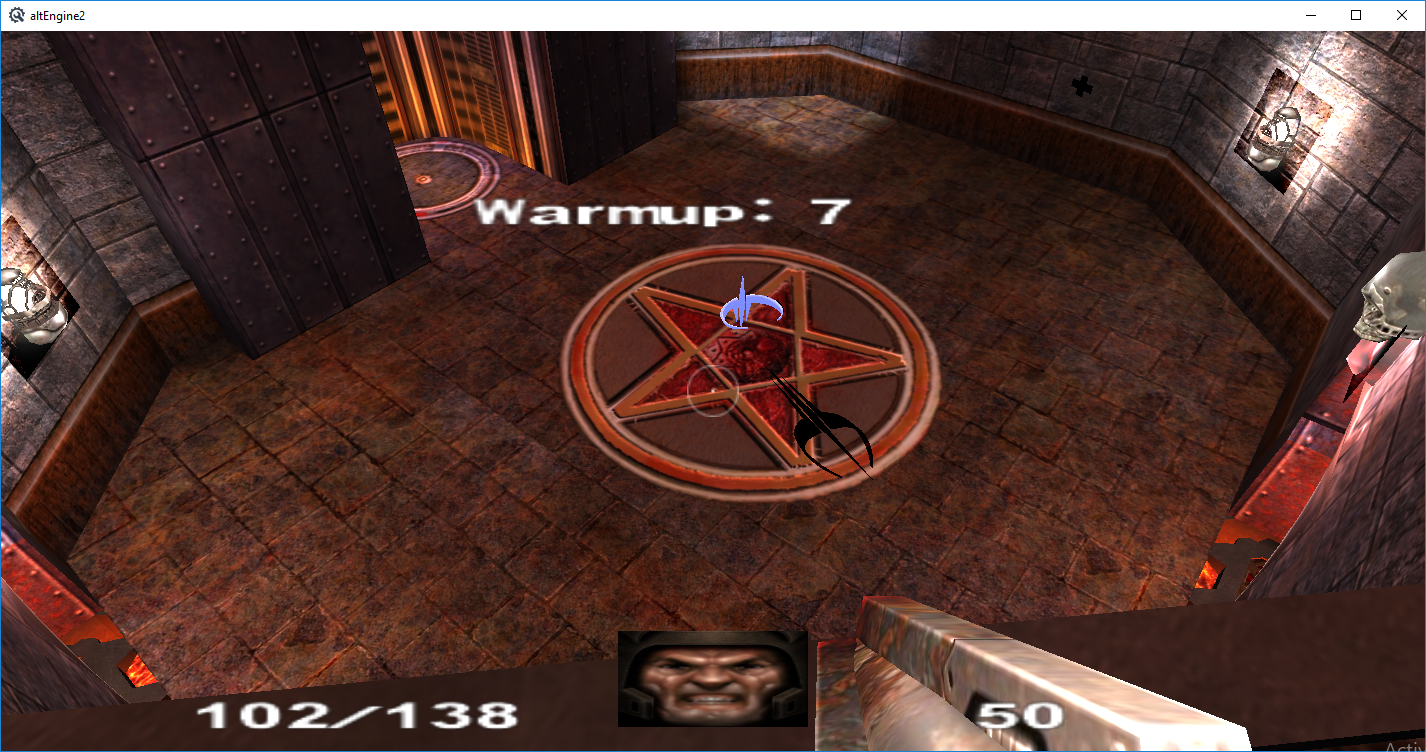
Small demo of multiplayer functionality on a local network, seems to work pretty nicely and is
somewhat playable, entities arent shaking anymore (probably was some floating point rounding
issue), fourth player is a bit laggy, but likely because I'm running all four on the same machine.
Does huffman compression of packets, still need to delta compress
somewhat playable, entities arent shaking anymore (probably was some floating point rounding
issue), fourth player is a bit laggy, but likely because I'm running all four on the same machine.
Does huffman compression of packets, still need to delta compress
17 / 54
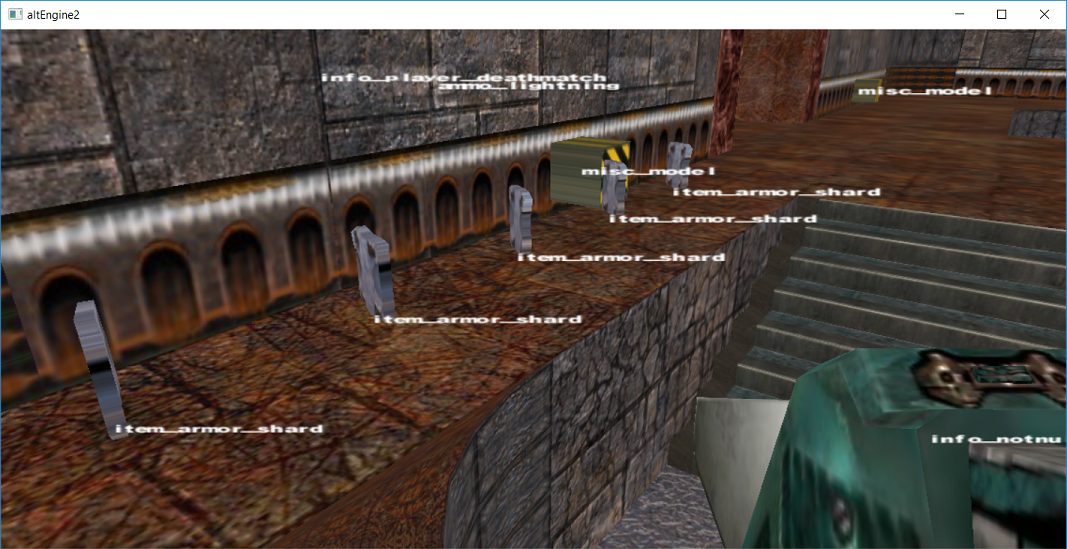
Show names over entities, kind of complicated as I need to transform point (0.0, 0.0, 0.0) from object to world, world to eye, divide by w, scale by 0.5, add 0.5, to get to normalized device coordinates
18 / 54

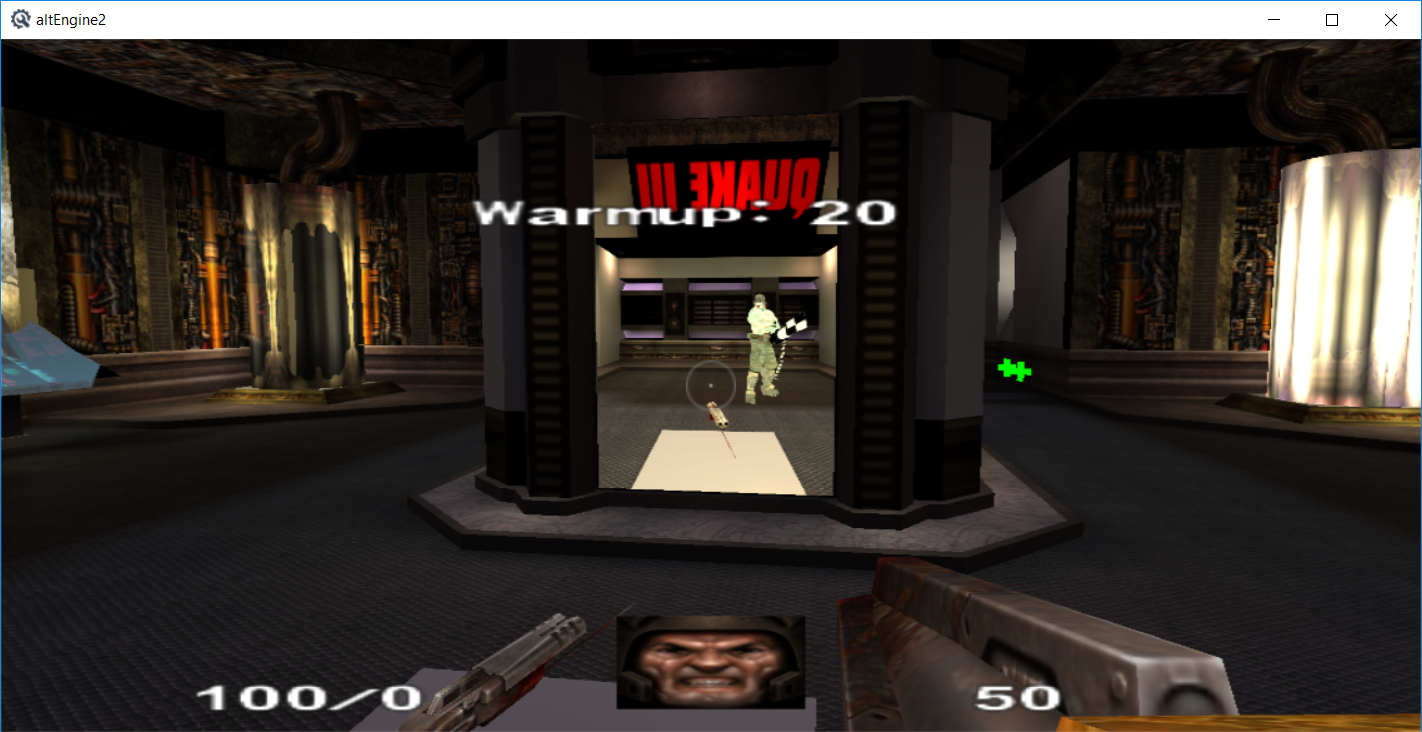
Shadowmapping early screenshot in my engine, rendering every light in left, right, up, down, forward, back, directions (cubemap) and using a FBO to save depth / Z buffer to a texture and finally doing the "real render" in camera space using the shadow matrix and depthmap to generate shadows
19 / 54
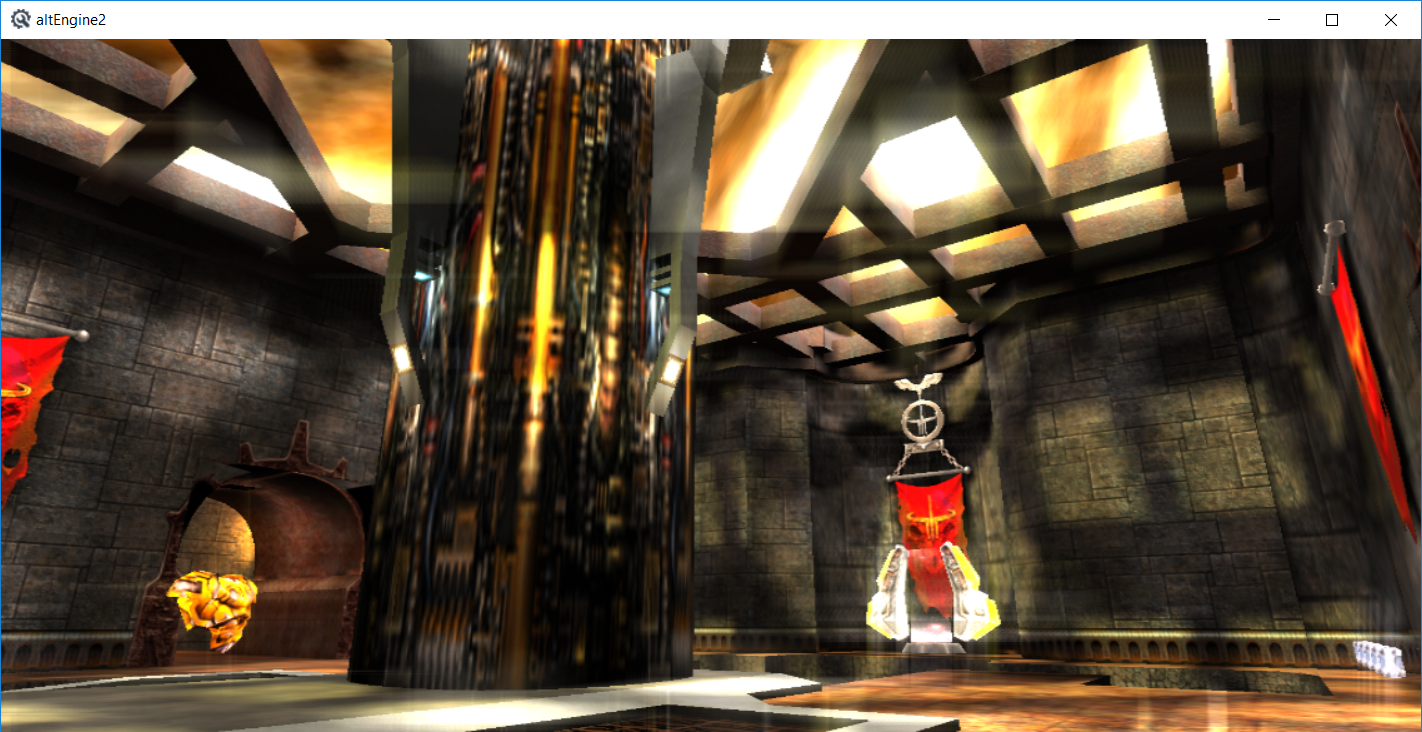
Implemented portal cameras and mirrors, just an FBO that renders the scene from the misc_portal_surface entity and uses it as a texture, although generating texture coordinates was a bit of trick
20 / 54
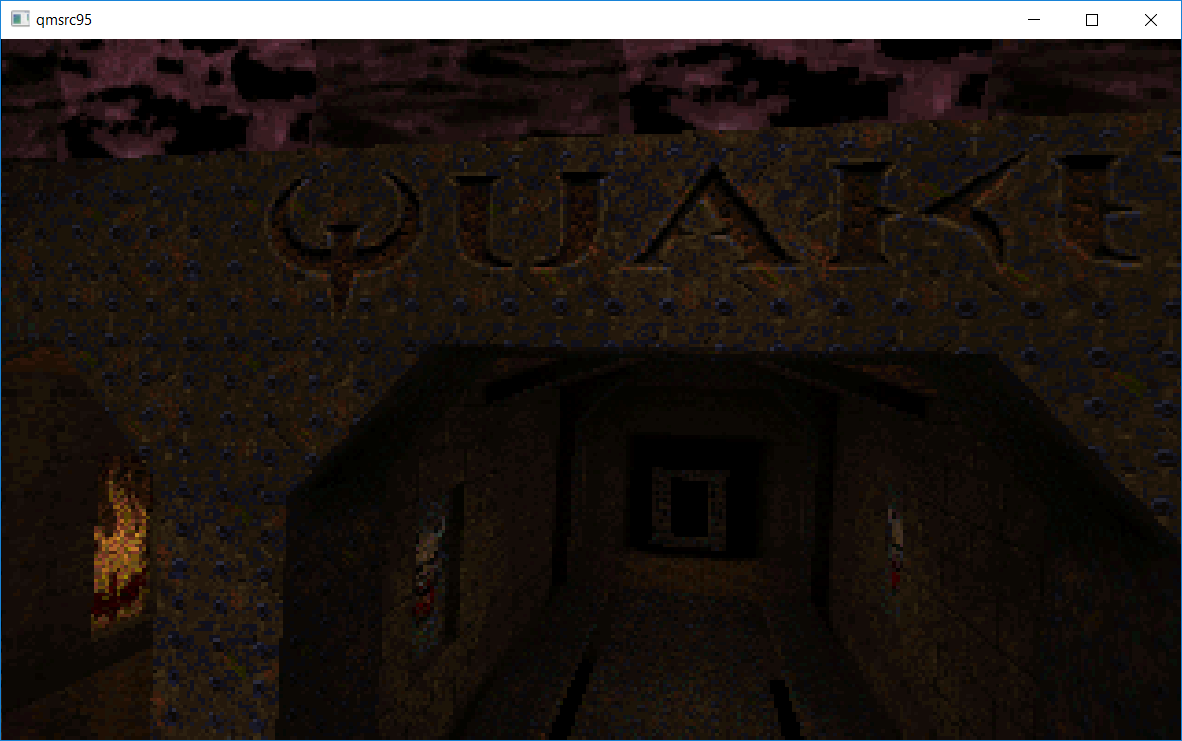
Ported nothings.org quake 1 software renderer to windows, very cool digestable example of software rendering, wanted to increase the resolution but was having issues with textures segfaulting when going past the original 320x200 mode 13h resolution, texture filtering is a nice thing we dont think about usually nowadays, qmsrc95.zip, Dos and Windows binary
included
included
21 / 54
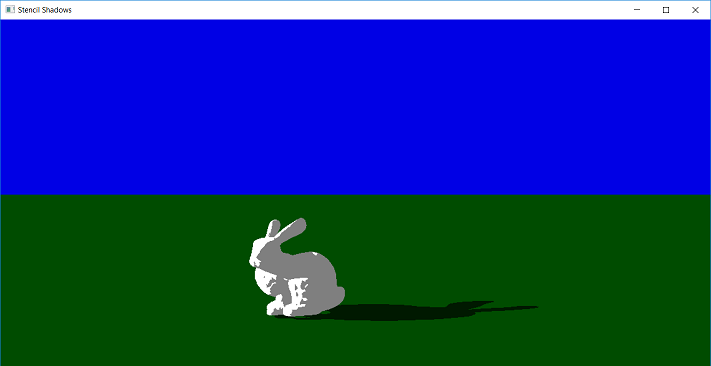
StencilShadows.zip, stanford bunny is kind of ugly... but hey it works. The idea is you dynamically generate 3d
geometry from the silhouette of an object from the perspective of the light by extruding it. Then you use that
shadow volume and the stencil buffer to create the shadow stencil through clever incrementing and decrementing
of front and back face depth test results. Used Jack Hoxley's tutorial as an example (always had a hard time with
winding order of the extruded sides) Already added it to my engine along with shadow mapping, the performance
is noticeably higher than shadow mapping, will add screenshots later -- I threw lucy and a couple of teapots in the
zip file if you want to change the model
Went ahead and added a z-fail version, so if you fly into the shadow, it will not invert the shadows. Requires capping the near and far side of the shadow volume and rendering the shadow volumes twice with different stencil operations. StencilShadows_zfail.zip
22 / 54
Bloom effect, pretty much you take your scene, mask out what you want to appear bright (in this case it's just an average color value above a threshold) and make the rest black. Then you blur the bejesus out of it, (usually gaussian blur) and add it back to the original image. High Dynamic Range rendering, on the other hand, uses more pixel precision (think float vs double) and "tone maps" it back to regular precision 8 bits per pixel (think of it like changing the exposure on a camera)
23 / 54
Screenshot of stencil shadows in engine, performance is pretty good and I prefer the hard high resolution shadow vs the pixelated soft shadows you get with shadow mapping -- still need to apply it to world geometry, only on items currently
24 / 54
Screenshot of screen space ambient occlusion in engine, it's a subtle effect that adds shadows to ambient lighting based on the depth map variations near a pixel, I cranked up the settings to better show whats going on versus the right side with it off -- people often view this as a 10fps performance hit that does nothing, but performance seems decent so far. See OpenGL SuperBible 7th Edition if you are interested in more info on how it works. Or just look at the books github SSAO shader is in the media-pack
25 / 54
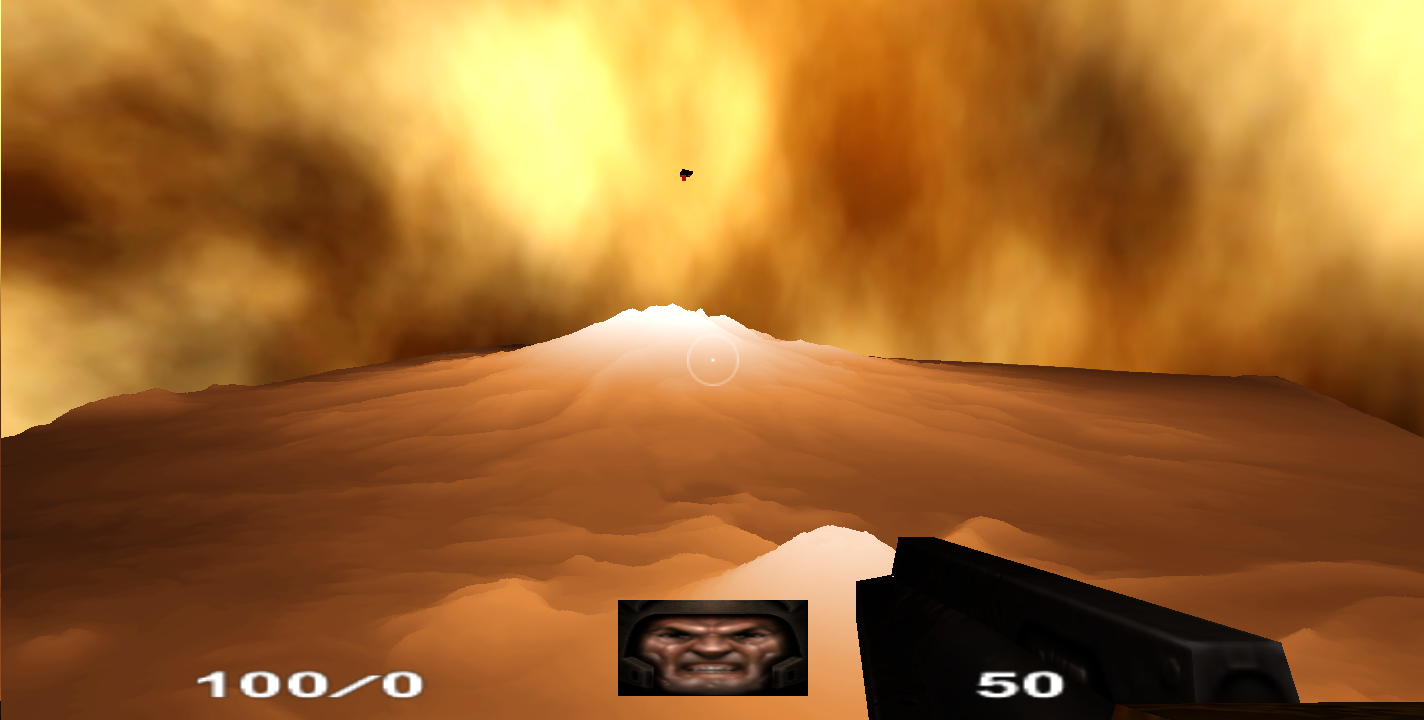
Heightmapped terrain, kind of neat how quick and at what large scale a simple heightmapped terrain can become, q3tourney2 (entire level) is the small thing at the top for scale. It's over a gigabyte in size when exported as an OBJ with 11,148,642 triangles and 5,579,044 vertices generated from a 2362x2362 image (think source heightmap is of mountains in new zealand)
26 / 54

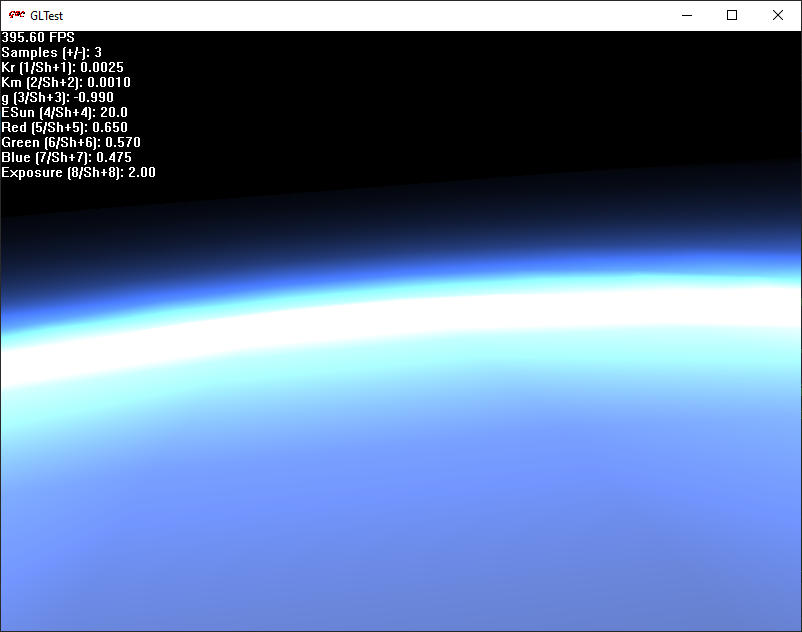
Earth gif, so this is an Icosahedron with triangle subdivisions, each frame there are more and more triangles representing the sphere, starting with 20 vertices and ending with 5,242,880, eventually I'll add a heightmap and create mountains on the planet and then add rayleigh scattering (makes the sky blue) which has a cool earth surface to space transition effect -- a good resource for icospheres is https://www.cs.cmu.edu/~fp/courses/02-graphics/pdf-color/08-shading.pdf -- I actually found the sample code *after* getting it to work, but here that is to save others some headaches: subdivide.c Update: figured I would add a link to the gpugems2 scattering demo for me to mess with later. Written by Sean O'Neil, and demo updated by https://github.com/dpasca/oneil_scattering_demo_udate to work. (original gave me some Cg compiler error)
27 / 54
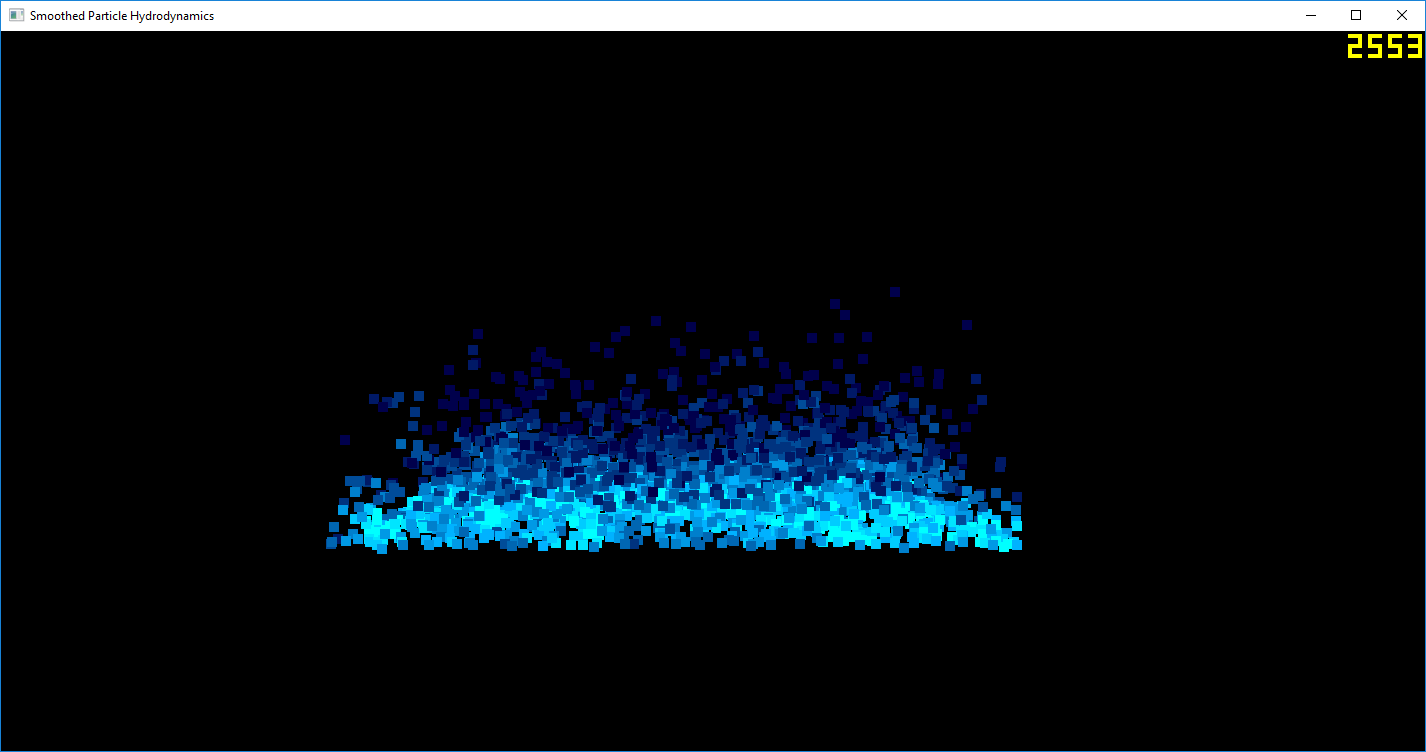
Very rough smoothed particle hydrodynamics simulation, still needs general improvements as well as generating a surface from the particles, old school approach would be to use marching cubes, but there seems to be newer screen space surface generation techniques that are faster. (eg: Simon Green Screen Space Fluid Rendering) Use's Monagan's approximations of the navier stokes equations and grid based sorting of particles to avoid O(n^2) computations for finding neighbors. Performance is a huge bottleneck for SPH as generally you are limited by the maximum amount of particles you can simulate in real time (and everyone wants more particles -- right click to add some). AMD has a good background video for those interested -- And Muller's paper makes some good points and is worth looking at. So, it seems AGEIA whose fluid I always liked used the following approach: Muller 07 screen space meshes
28 / 54
de_dust2 from counter strike: source being rendered as lines, source engine bsp files use a quake2 style edge list to store faces (relic from software rendering days) that I need to triangulate to render normally, that and I need to figure out how to get the textures loaded still -- It'll take some time to render properly and get collision detection working like I do with quake3 bsp's
29 / 54
Screenshot of my engine software rendered, sutherland hodgman clipping still needs work, but fps is decent. Getting perspective correct texture mapping was a bit troublesome, you interpolate 1/w, u/w, and v/w, I was using 1/z, u/z, and v/z, which would have worked if I used the Z before perspective division, not after. (same goes for W, but after division it becomes 1.0, so pretty obvious) -- Updated from old screenshot that had z-buffer issues
30 / 54
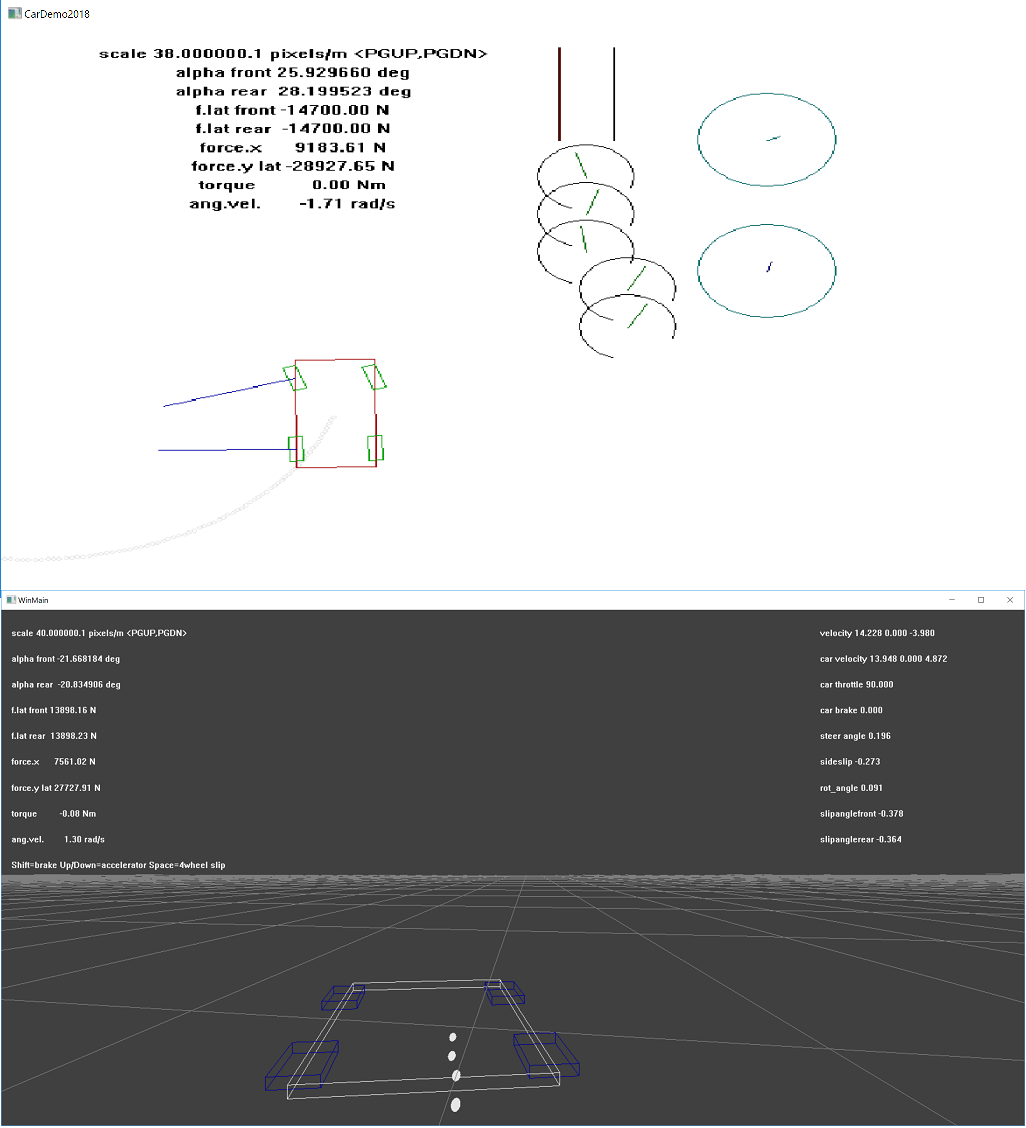
This is a windows GDI version of the old cardemo08.zip from Marco (original used an old version of allegro, which still works, but is pretty old) It accompanies an old car physics paper that describes the basic simulation of vehicles which is still very much relevant today. You can find the original version here: https://github.com/spacejack/carphysics2d, Which was backed up by a guy that made a javascript version of it. I'll eventually make a 3d version of it and slowly deal with things like inclines, collision detection, leaving the ground etc -- Below is the beginning of the 3d version, transformations are bad currently, and it's using old style fixed function opengl for now
31 / 54
Started messing with spring mass systems, mainly to get a good suspension system for car simulation, but started down the path of cloth simulation... One spring mass, leads to multiple springs connected to each other, which eventually leads to a fabric of springs. To get good cloth though you need a lot of connections, a center point needs to connect up, down, left, right "structural springs" and diagonally "shear springs" and if you skip one left right and up down "bend springs" give you some better self bending properties. -- Pain in the behind to set all those springs up though -- nvidia paper on the layout.
Note: I made the mistake of putting the points and mass into the spring class, what you really want to do is have separate class for particles/points with mass and add the spring forces to those which will do the integration. (you can add pointers to the particles into the spring class) This also makes the spring class too simple, as it doesnt deal with gravity, position, velocity, acceleration, etc and essentially just does force_spring = -k * displacement, but makes multiple springs with a single mass much easier to handle
Note: I made the mistake of putting the points and mass into the spring class, what you really want to do is have separate class for particles/points with mass and add the spring forces to those which will do the integration. (you can add pointers to the particles into the spring class) This also makes the spring class too simple, as it doesnt deal with gravity, position, velocity, acceleration, etc and essentially just does force_spring = -k * displacement, but makes multiple springs with a single mass much easier to handle
32 / 54
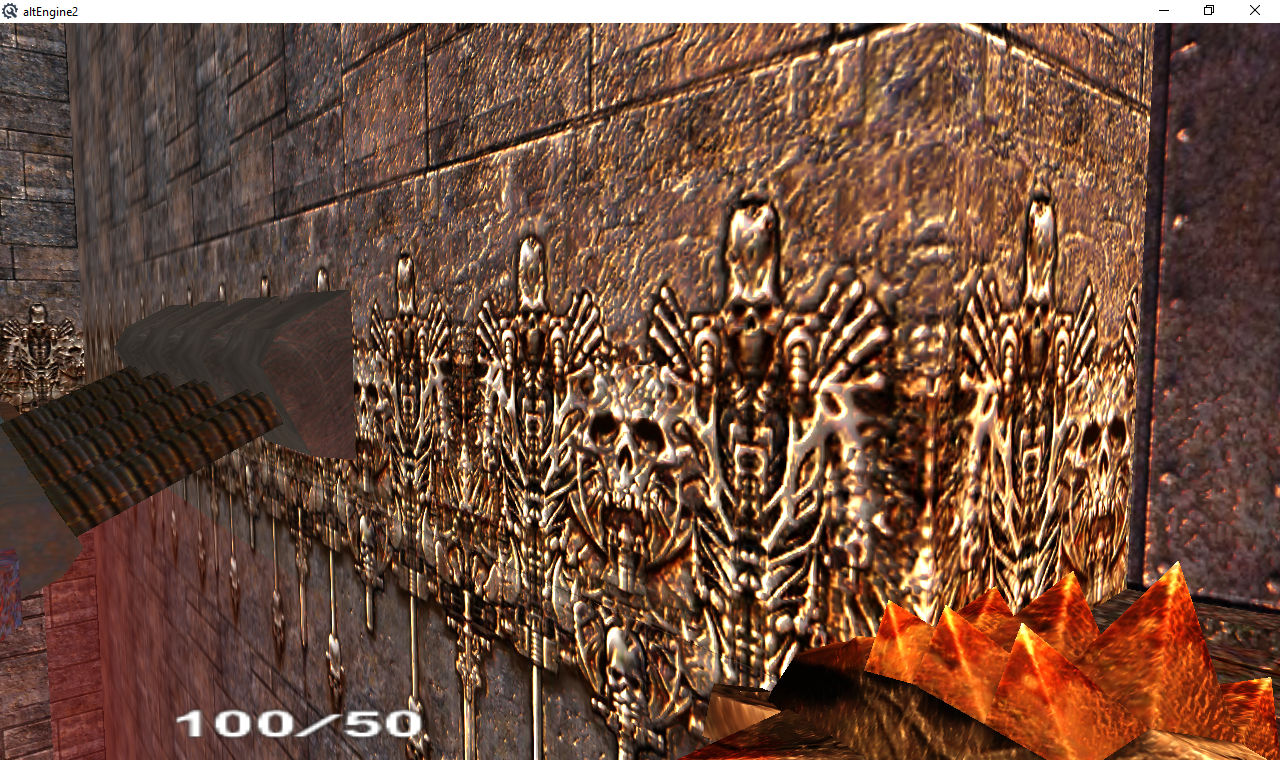
Cloth simulation on a flag in engine, I was going to add more points to the flag to get better results, but thought to myself I better look at it as points to see how many I've already got, 20x40 points looks a lot more dense than I thought, triangle wise, front face and back face that's like 1482 triangles, per side, or 8892 vertices, which is a lot for a flag, coming close to the entire triangle count of the map... so maybe less is more here as in most cases
33 / 54
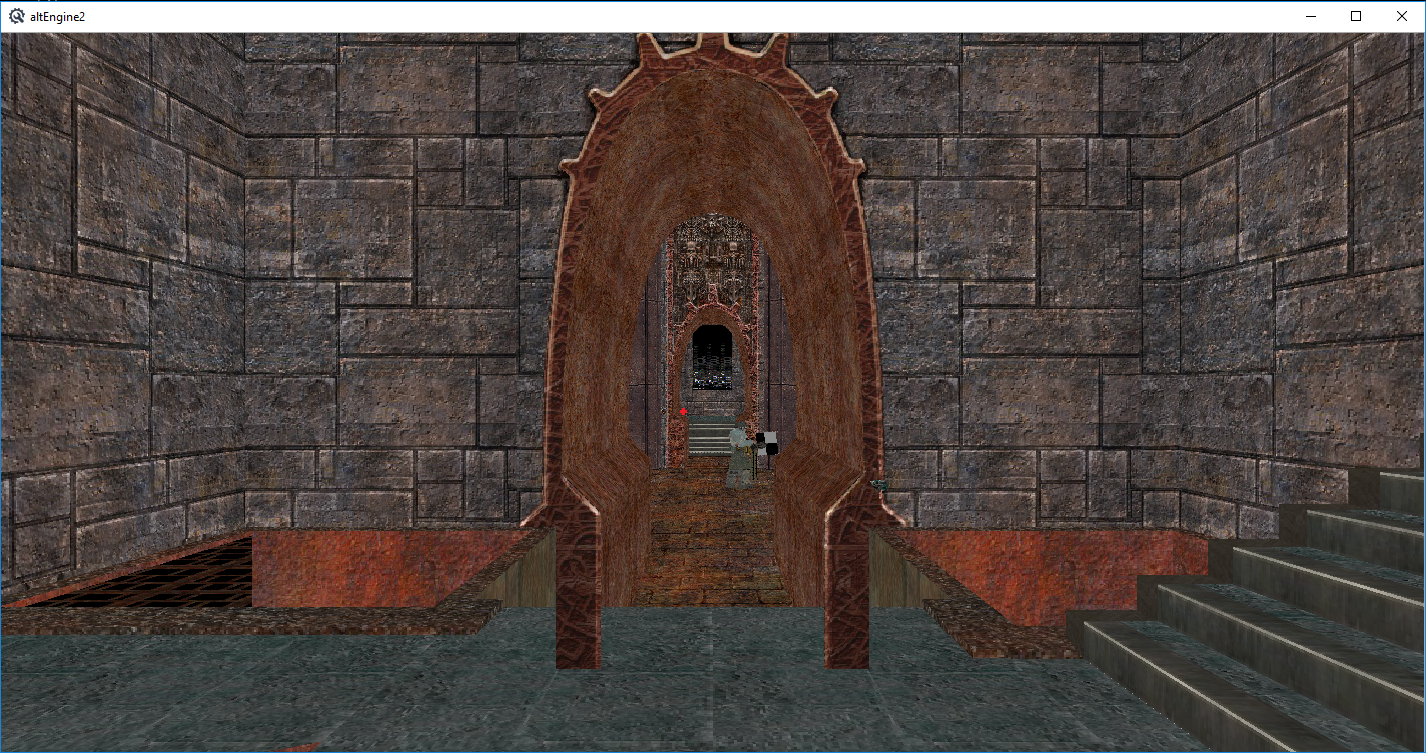
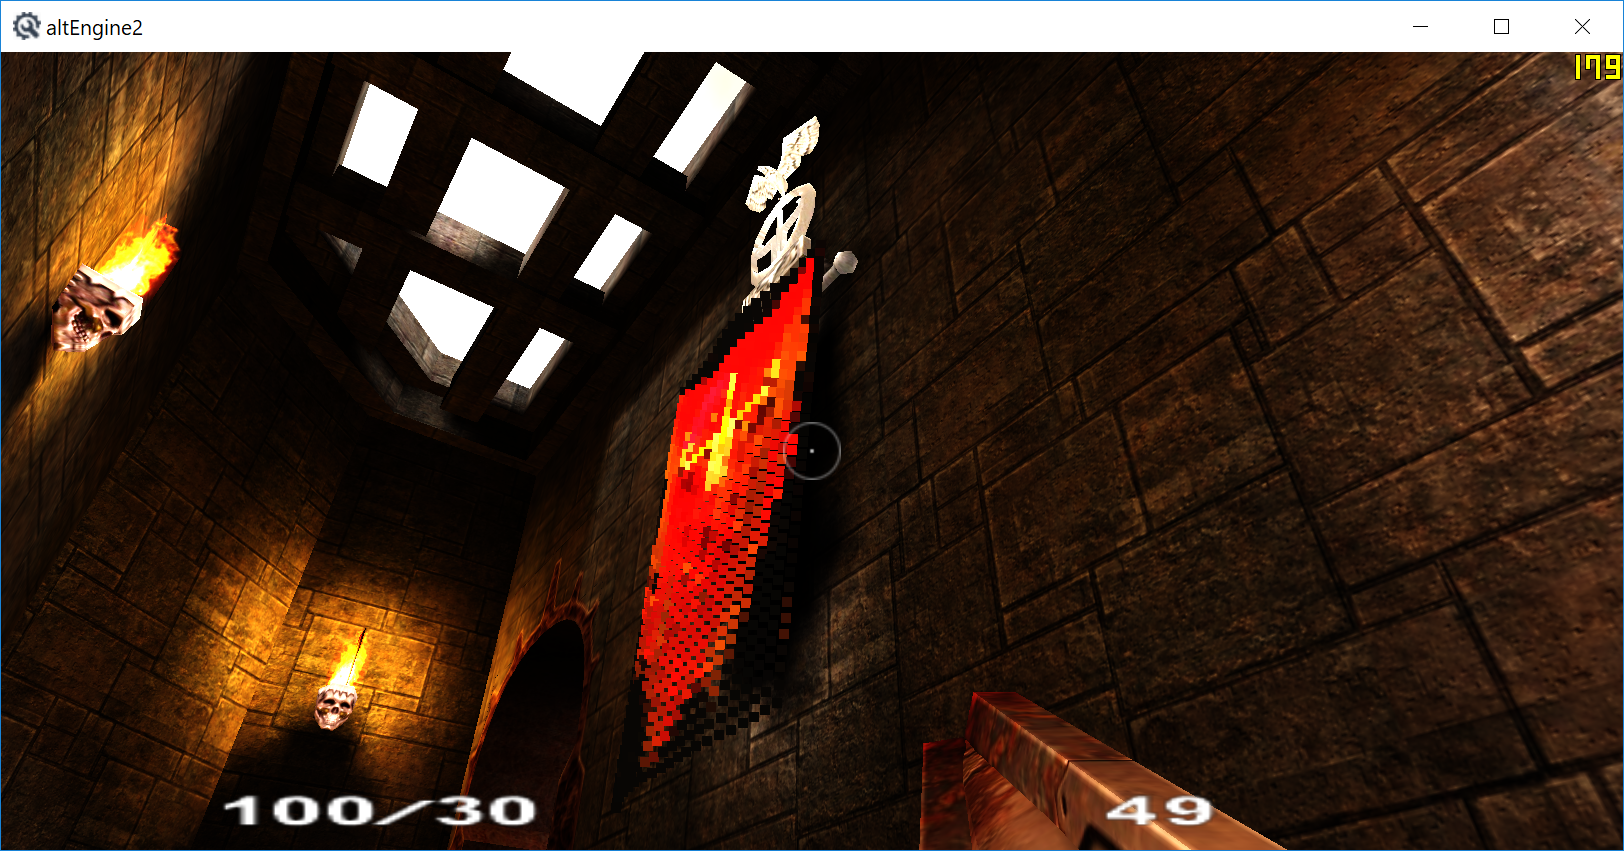
Normal mapping, had this working a long time ago along with displacement mapping, but never left it permanently enabled, now it's easily toggleable from the console. My non-lightmap per pixel lighting is still a bit odd though, (changes a bit when rotating the camera about) I'll probably re-add displacement mapping again too, but need to go through all the normal maps and add height info to the alpha channel again. Note: I've extremely exaggerated the normal mapping effect here, I've always felt like it makes things look too 'plastic' but with a good artist I think it can be a great visual improvement while still being subtle. -- Brief explanation is that instead of using a single normal for the entire triangle, you encode the normal in a texture and perform the lighting per pixel using the texture's normal which approximates the true surface normals (normal means direction away from the surface)
34 / 54
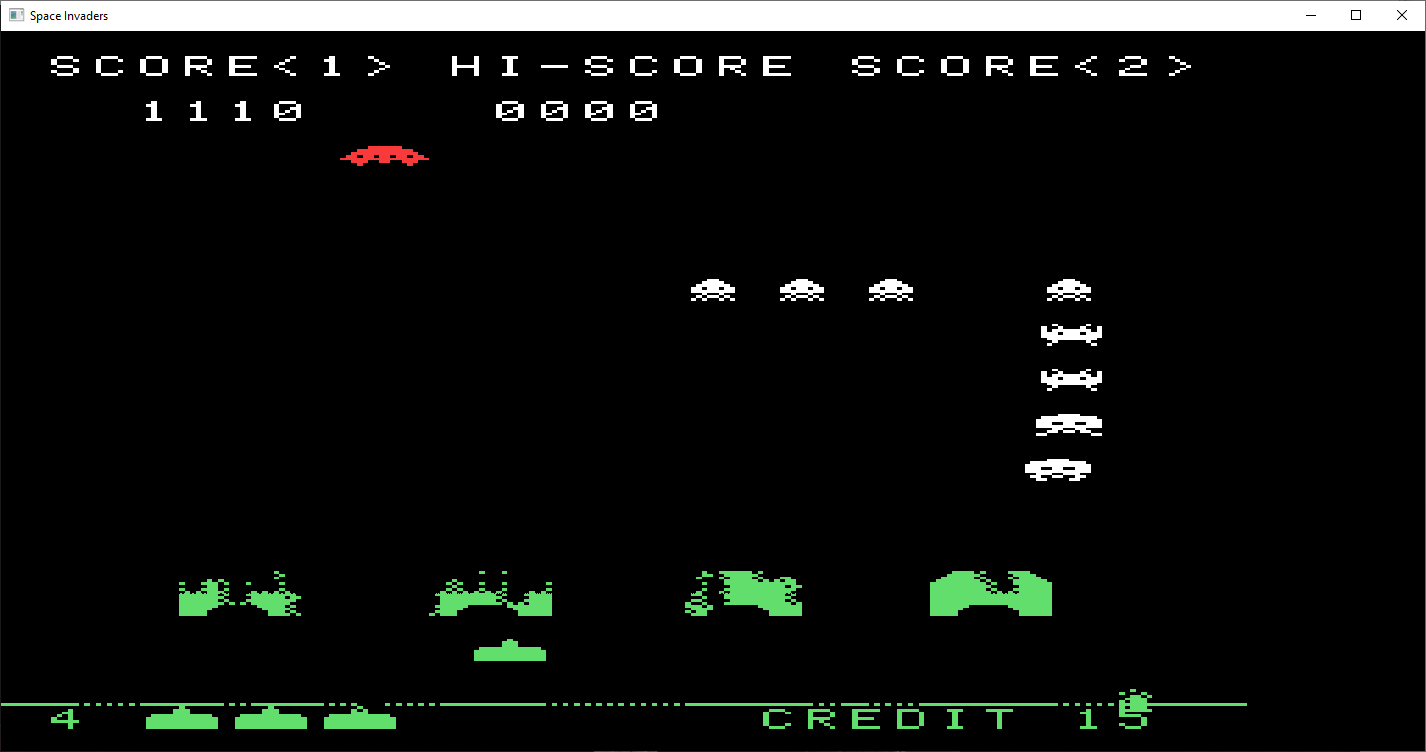
So this is an Intel 8080 Emulator running Space Invaders based on emulator101.com's tutorials.
Originally I started with their sites example, 8080emu-first50.c, got it running and was like, hey, this isn't doing anything -- it printed instructions, but didn't render anything or do much else. I got the rom files from this page: https://github.com/LemonBoy/Space-Invaders-Emulator/ and started making a hybrid 8080 from the two code bases combined, but it didnt work. So I just got the LemonBoy example to compile unmodified and it sort of worked, the image was sideways and the input keys didnt work. So I fixed the sideways image and eventually realized, no, that code doesnt work at all as aliens were in the wrong places and weird stuff was happening.
But from that code I figured out the video memory locations and how rendering worked pretty well, so I went back to the first example with my new found knowledge. The 8080emu-first50.c ran and showed the intro screen now with the drawing code, but then infinite looped after a while. -- Turns out it needs the video screen interrupts implemented for it to get out of that state. Got the interrupts working from emulators101 Cocoa example and interrupt page, but then needed to get the input working so I could play. Referencing the broken example, the emulator101 page, and the cocoa example, I got the controls working eventually. -- But for some reason making the input work stopped the aliens from drawing at all, fixed a little bug there (wasnt setting register A after the OUT instruction) and then it finally worked completely. (Note the above mentioned 8080emu-first50.c example is missing a lot of opcodes that you can get from the cocoa example)
Currently the left side of the screen is rendering the working memory, change the VRAM_START 0x2400 to fix that if you'd like, but I left it as is. I take no credit for the code as it was mostly from emulator101's public domain example. But serves as a good basis for something like the z80 gameboy or a full 8080 emulator -- Oh yeah, left/right moves, space shoots, shift is start button, control adds a coin. So to start the game press Control to add a coin, then shift to press Start, and you'll start playing.
Went back and added sound and color here SpaceInvaders2.zip Note: sound has no mixing, so one sound effect at a time, and the color is just based on the "gel backing" that they had in old arcades, which just color based on y position. I'll admit I never actually played the real space invaders, maybe DOS clones is the closest I got
35 / 54
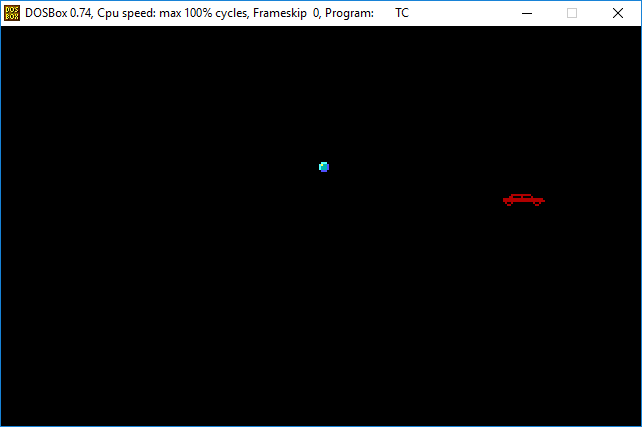
Just some sprites moving about in MS DOS graphics Mode 13h. (320x200 stretched to 320x240), compiled with TurboC++ DOS.C might make a spinning cube or something later. But would like to get VESA modes going, (higher resolutions) but they are a super pain in the behind to set up compared to VGA modes
-- Managed to get VESA going from old Hello VBE! Example SVGA.C
-- Did the same thing now in 1024x768 using the above example, sprites blink because I am writing to the video ram twice, (clear and sprite draw) really need a buffer that is then blitted, but 16 bit mode can't allocate 768k sadly DOS2.C
-- Here's another Vesa example that supposedly is faster as it uses a linear frame buffer lfb.zip that compiles under WATCOM using DOS4GW in 32bit mode (DOS2.C uses 64k memory with 'bank switching' which remaps that 64k around, which is slow as it requires an interrupt)
-- And finally, a LFB version of the same darn thing that has good performance in high resolution and clears and such without flickering DOS3.ZIP
36 / 54
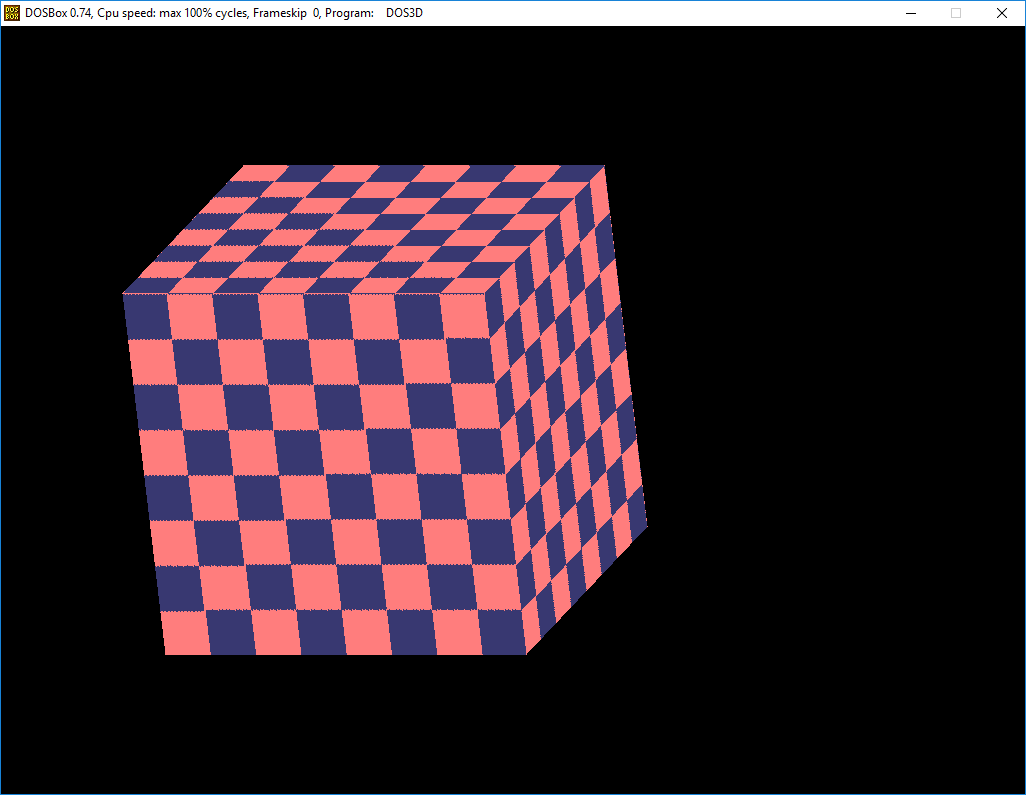
3D spinning software rendered cube in 32 bit MS-DOS at 1024x768 256 color, frame rate is kind of slow, better at lower resolutions, but then it looks bad. Being slow is actually a good thing here as it allows you to notice performance improvements to the rasterization easier. (That said this is the older affine textured barycentric triangle code from the windows example modified to DOS) Code is messy, but hey it works DOS3D.ZIP compiled with WATCOM
37 / 54
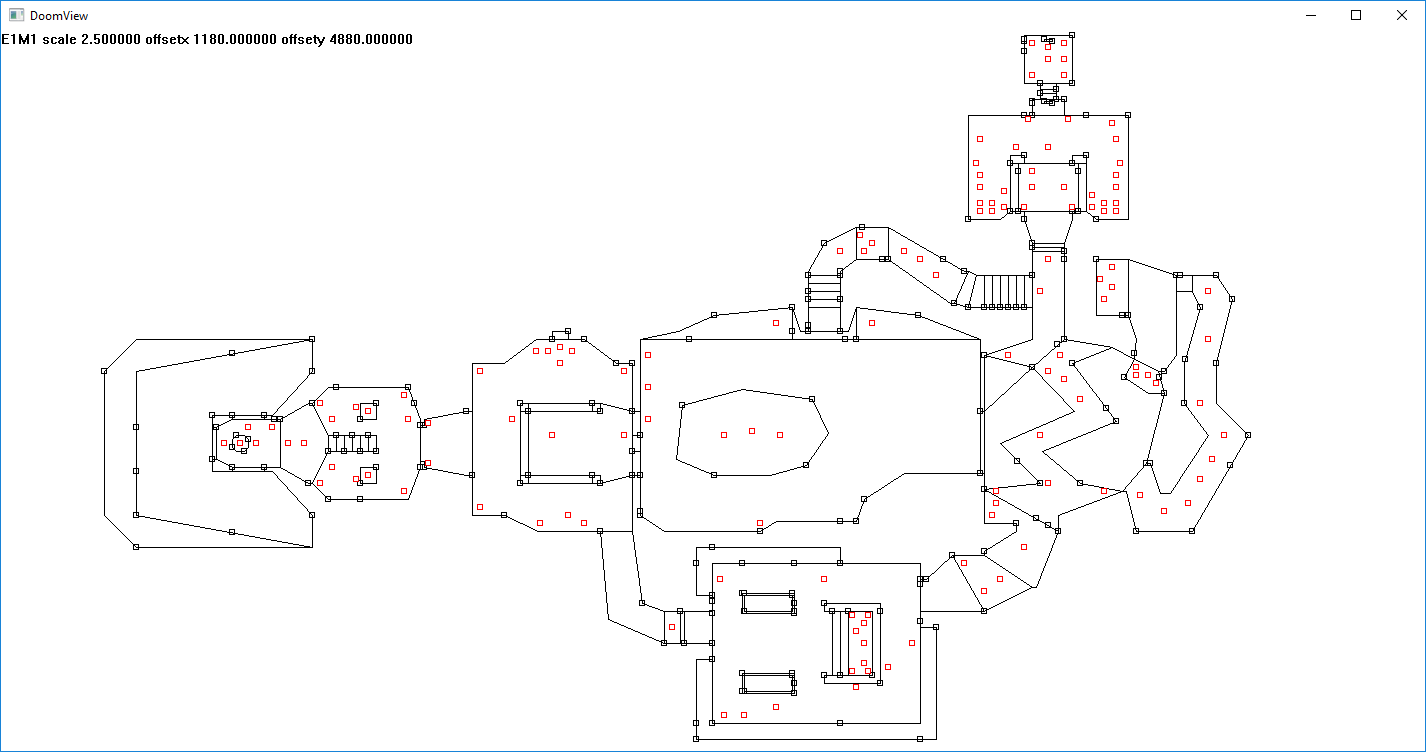
DOOM level viewer, just draws the vertices and linedefs, (DOOM is completely 2d if you didn't know, each line is extruded to have floor height and ceiling height) took like less than an hour I was surprised how easy it was to get together. Arrow keys will pan, pgup/pgdn zooms, keypad plus and minus change level, you'll need the visual studio 2015 redistributable installed if you dont already doomview.zip -- went ahead and added map objects (things lump) in red
-- doomview2.zip - this one does the BSP traversal, press F1/F2 to enter the BSP mode (and increase/decrease the traversal depth), the BSP dividing planes are labeled P0, P1, P2... etc then space to mask axial bsp planes that you are on the inside of, (angled lines are a bit more trouble to mask with basic GDI functions) blue lines are the segs of your sector/cell, multicolor lines (dashed or solid depending on the side you are on) are the BSP planes. If you want to see how in general the BSP divides the level, hold F1 until you get to a minimal depth, then hold space and increase the traversal depth with F2. The mouse cursor is view/player position. F3/F4 will enter the draw order mode and change the max subsegments drawn to show the draw order (near to far) Typically you would throw away anything outside your view frustum so you wouldnt spend time attempting to draw things that are behind you. Hold F3 then when you get down to one draw segment, press F3 to increase the draw limit to see the way the draw order would be sequenced. (Hope all of that makes sense)
-- doomview3d.zip this one just add crappy line projection code, walk around with the arrow keys, will improve later. Kind of never finished this, but hey it has font rendering! doomview3d2.zip
38 / 54
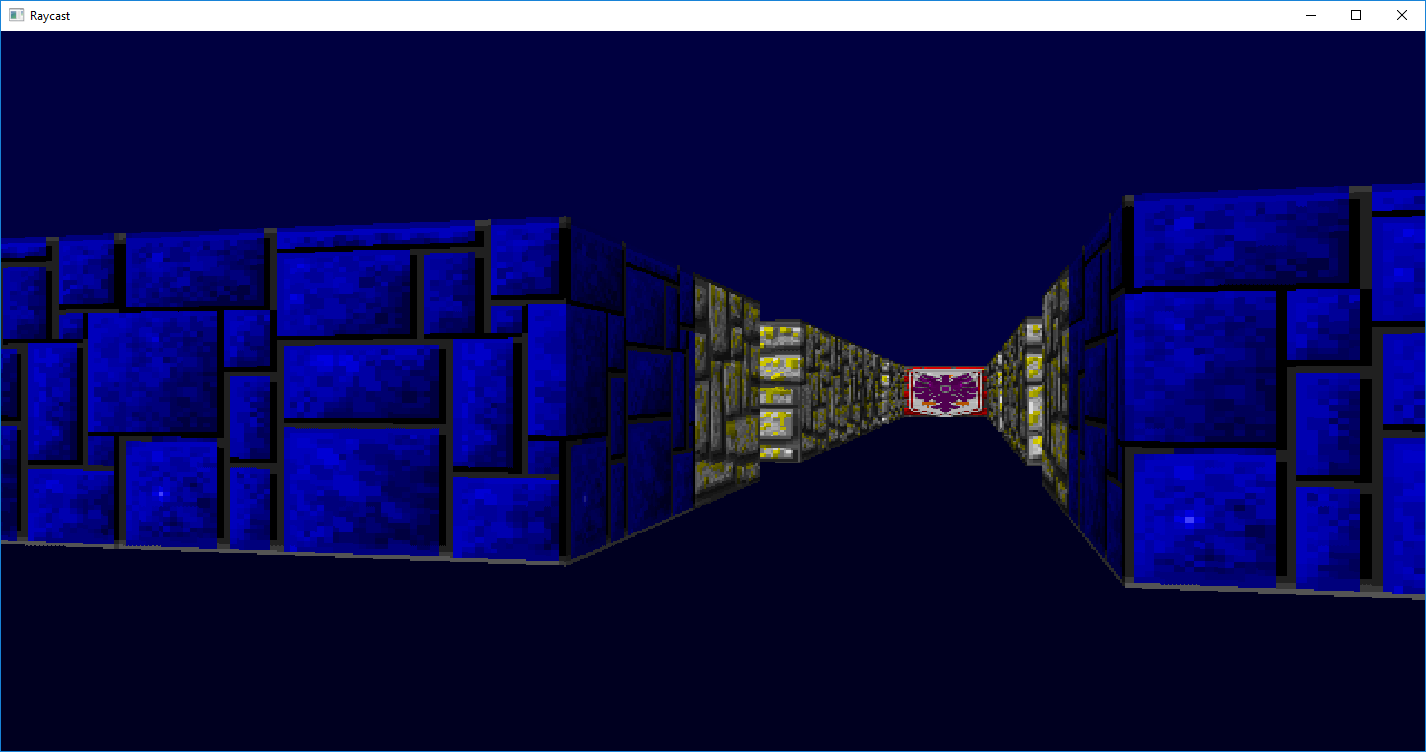
Wolfenstein 3D style Raycast code from https://lodev.org/cgtutor/raycasting.html modified to run on windows, currently flickers a bit as I havent messed with it much, but just sticking it here so I can look at it later raycast.zip went ahead and added textures and wolfenstein style two tone floor/ceiling
39 / 54
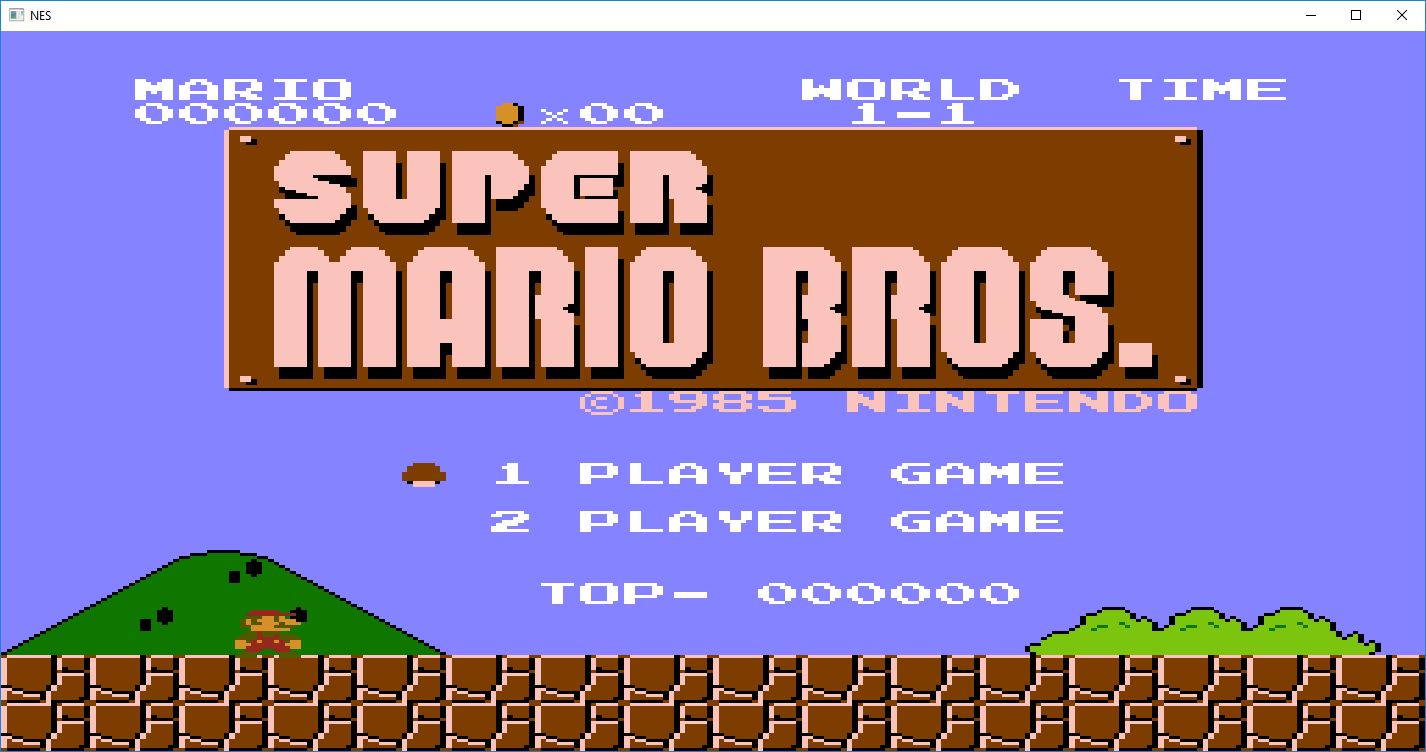
Bisqwit's NES Emulator (MOS 6502 style processor) ported over to windows, was messing with his doom style portal renderer, got that to work in linux (visual studio wont compile it due to a lot of non standard GCC stuff in the code) and started looking at the emulator shortly after, works in linux, and was surprised it compiled in visual studio 2015 without much trouble, threw away the SDL stuff, added win32 sound output and keyboard input, and made a small suggested mod to make the NTSC output look better. Here is the single source file and visual studio 2015 debug binary, code is ugly, but most emulators are. nes.zip Note: when compiling it worked in debug mode, but not release, probably some bad optimizations or something there. --- have it hard coded to run "test.nes" currently, no roms included due to copyrights etc. Bisqwit video1 video2 and faq Original source code here I got from this decoded article -- Note: Music was perfect in megaman 2, but super mario had stuttering gameplay for some reason, so I sacrificed the music quality for gameplay, press keypad add/subtract to change the game speed (delay per 10k instructions) Arrow keys move, enter is start, space is select, and Z and X are A and B respectively
40 / 54
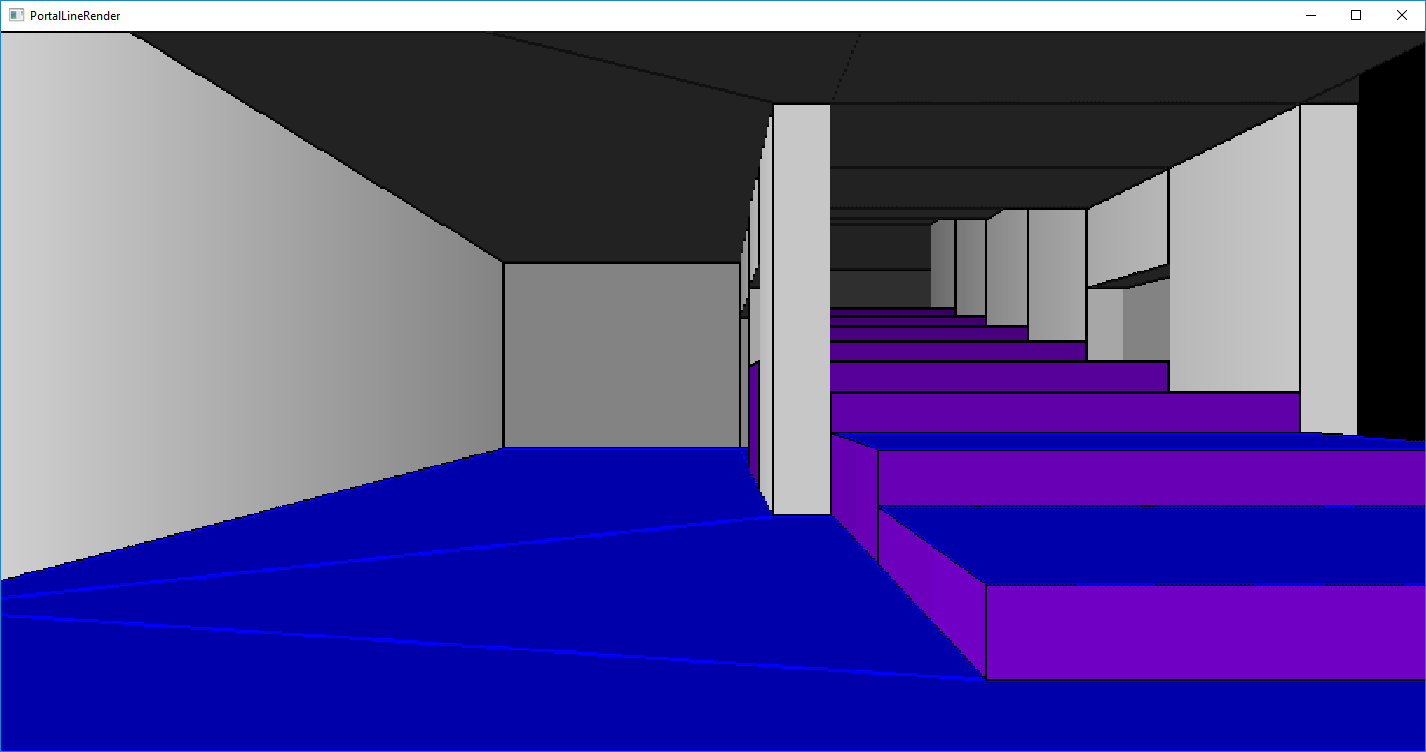
This is a windows version of bisqwit's doom style portal renderer, original source code here: prender.c and accompanying video: here. He also has a more advanced version that has textures and generates a 4.5GB lightmap file from them, if you are interested check the video description and run it on linux. -- I'm going to use this style of rendering to draw doom maps from the wad file, this tech is a bit closer to duke3d / the build engine as it supports things like a room being on top of another room as well as non-euclidean geometry through the use of portals. (think of a tiny closet opening into a giant cathedral type stuff, under the stairs you might notice it a bit) Originally I was just going to create a triangle mesh from the doom maps and render them with OpenGL/D3D, but doing ear-clip triangulation of the sectors was becoming a pain so I figured might as well use the data structures as intended. Doom renders individual vertical columns of pixels at a time from the projected wall lines similar to wolfenstein raycasting. It treats floors and ceilings as a sort of oblique planes that dont have any real geometry to them that it calls visplanes. Compared to wolf3d, doom supports the additional ability to render floors/ceilings/walls at different heights and at angles, but no ramps or sloped ceilings can exist. You also can't look/up down as the renderer relies heavily on the assumption that walls will always be vertical lines for speed reasons (Intel 486 era CPU's with 4MB ram) portal.zip The display might be a bit glitchy as I'm not really syncing the page flip and the collision detection seems off when compared to the linux version, but it works. WASD to move, mouse to look about -- note modified it quite a bit to make it subjectively cleaner -- although if you want something closer to the original prender_win32.c is still laying about
41 / 54
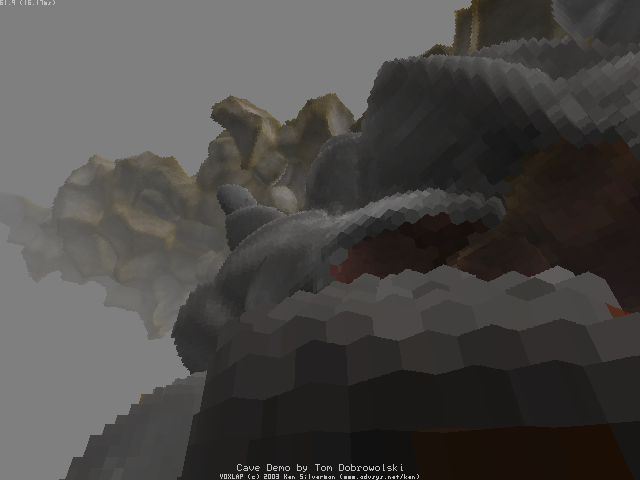
So this isn't my code, but I remember seeing this old cave demo a long time ago and thinking these guys are doing it right. Didn't realize it at the time, but it was Ken Silverman of Duke3D / Build engine fame and Tom Dobrowolski who I think worked off Ken's initial engine prototype. So think of a voxel like a 3d pixel, the smaller the block, the better the fidelity. Issues that you run into are data sizes (as a 3d array of small blocks gets very large very quick) Animation, (ends up becoming frames of blocks, which dont look very good unless again you have small blocks) and the difficulty of using traditional 3d hardware, which is set up to transform and raster triangles. So far other than worms3d I havent seen many voxel based games out there. A more modern engine, Atomontage, brings things further than this example. But this example has source code designed to run on older machines (Pentium III's) where atomontage sort of duped investors into thinking there would be a ROI on their investment and squandered their money while keeping the code closed source. See Ken's page for the source and cavedemo seen here: http://advsys.net/ken/voxlap/voxlap05.htm -- Note to compile this you'll probably need an older visual studio -- might want to cruise github to see if anyone has already brought this code into the present -- also dont confuse voxels with minecraft, which uses the GPU to render a lot of cubes, like voxels, but made of triangles. One more thing, Kevin Bray has a pretty cool sparse voxel octree demo here, sparse meaning dont store all voxels (only outer visible shell) and use an octree to compress storage by using bigger voxels where everything is uniform. In terms of rendering, the voxlap demo does something slightly more advanced than wave surfing to allow six degrees of freedom. -- So I was thinking you could probably use a DDA type line drawing algorithm in 3d to raycast voxels, and googled about and found this video which does exactly that:https://m.youtube.com/watch?v=gAeR2PLTwA8 I took his code and took out all the borland stuff and got it going in visual studio voxel.zip He is using the voxel file format from Ken's demo, and it ends up using 4GB (1024 * 1024 * 256 blocks at 16 bytes each) just for the voxel data structure (compile as 64-bit to prevent malloc failing) the voxel.zip code is using opengl which I compiled with glew, but is essentially just using it as a frame buffer, so I'll go back in later and take OpenGL out as it's not needed. Still looks kind of low res, but the code is interesting and compact, theoretically if you get the algorithm right it would look like Ken's demo, but without all the license restrictions -- one thing I noticed though is that it doesn't set interior voxels as solid, so things are a hull only (ie: pressing x to shoot should make tunnels) -- Version without OpenGL voxel_sw.zip -- throw threads into this and I'm sure it'll look much better
42 / 54
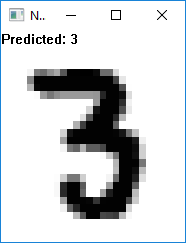
So neural.zip is a neural network digit classifier. Tab will load a random MNIST number, Enter will predict what it is, space will clear the screen. You can draw with the mouse, but results arent great for stuff that wasnt in the learning set. (could also be that I dont have much of a fade effect on the pen, which was added later) Most of the neural network code was taken from here: https://github.com/mmlind/mnist-1lnn/
A good written intro to Neural Networks is here -- and a few youtube videos (which got me started on this whole thing) are here and here
-- PS: neural2.zip is a version using EMNIST dataset for alphanumeric characters -- these currently only do one epoch and the neural net is pretty basic, so again accuracy isnt great. I may swap out the network with a convolutional neural network later to improve accuracy
-- Later has happened, neural3.zip is the mnist digit recognition using the convolutional neural network from here: https://github.com/can1357/simple_cnn Accuracy should be a lot better, his code (unmodified) will Learn then start processing a ppm file every second. Mine will let you draw directly on the window after learning has finished. Press tab to load an image from the dataset, space to clear the screen, and enter will process the image buffer. Learning takes a bit longer with these CNN's, but it's much more accurate, will throw together an alphanumeric version here is a bit. Technically learned data can be saved to disk and loaded to stop the annoying startup wait, but that is not implemented in these examples
-- Finally neural4.zip, which is the same Convolutional Neural network (CNN) from neural3.zip, but working on the extended MNIST dataset giving alpha numeric classification. Seems to work pretty good, but I find that it often doesnt try when it gets confused, ie: 100% confidence or 0% confidence, few cases in between. This probably isnt the "best" CNN, as you can go deeper etc, but at that point you may want to start using multiple cores and GPU's with TensorFlow and python, but it seems to work somewhat decently
-- cifar10.zip This one works on the CIFAR-10 data set (small images) download the data seperately and drop it in the data directory CIFAR-10 binary version (suitable for C programs) (again not great at classifying)
-- I would do CIFAR-100, but since it has super classes and classes I think it would be nice to have a neural net to determine the superclass and then another neural set for each sub class group eg: one neural network determines it's a flower, then another neural network determines the flower type - cifar100.zip cifar100b.zip -- So the second one is the approach I suggested, it has a *huge* training time, the first one just runs a neural net on each superclass and I select the one with highest confidence. -- I would say both are very bad at cifar100 though, but that leaves room for future improvement
43 / 54
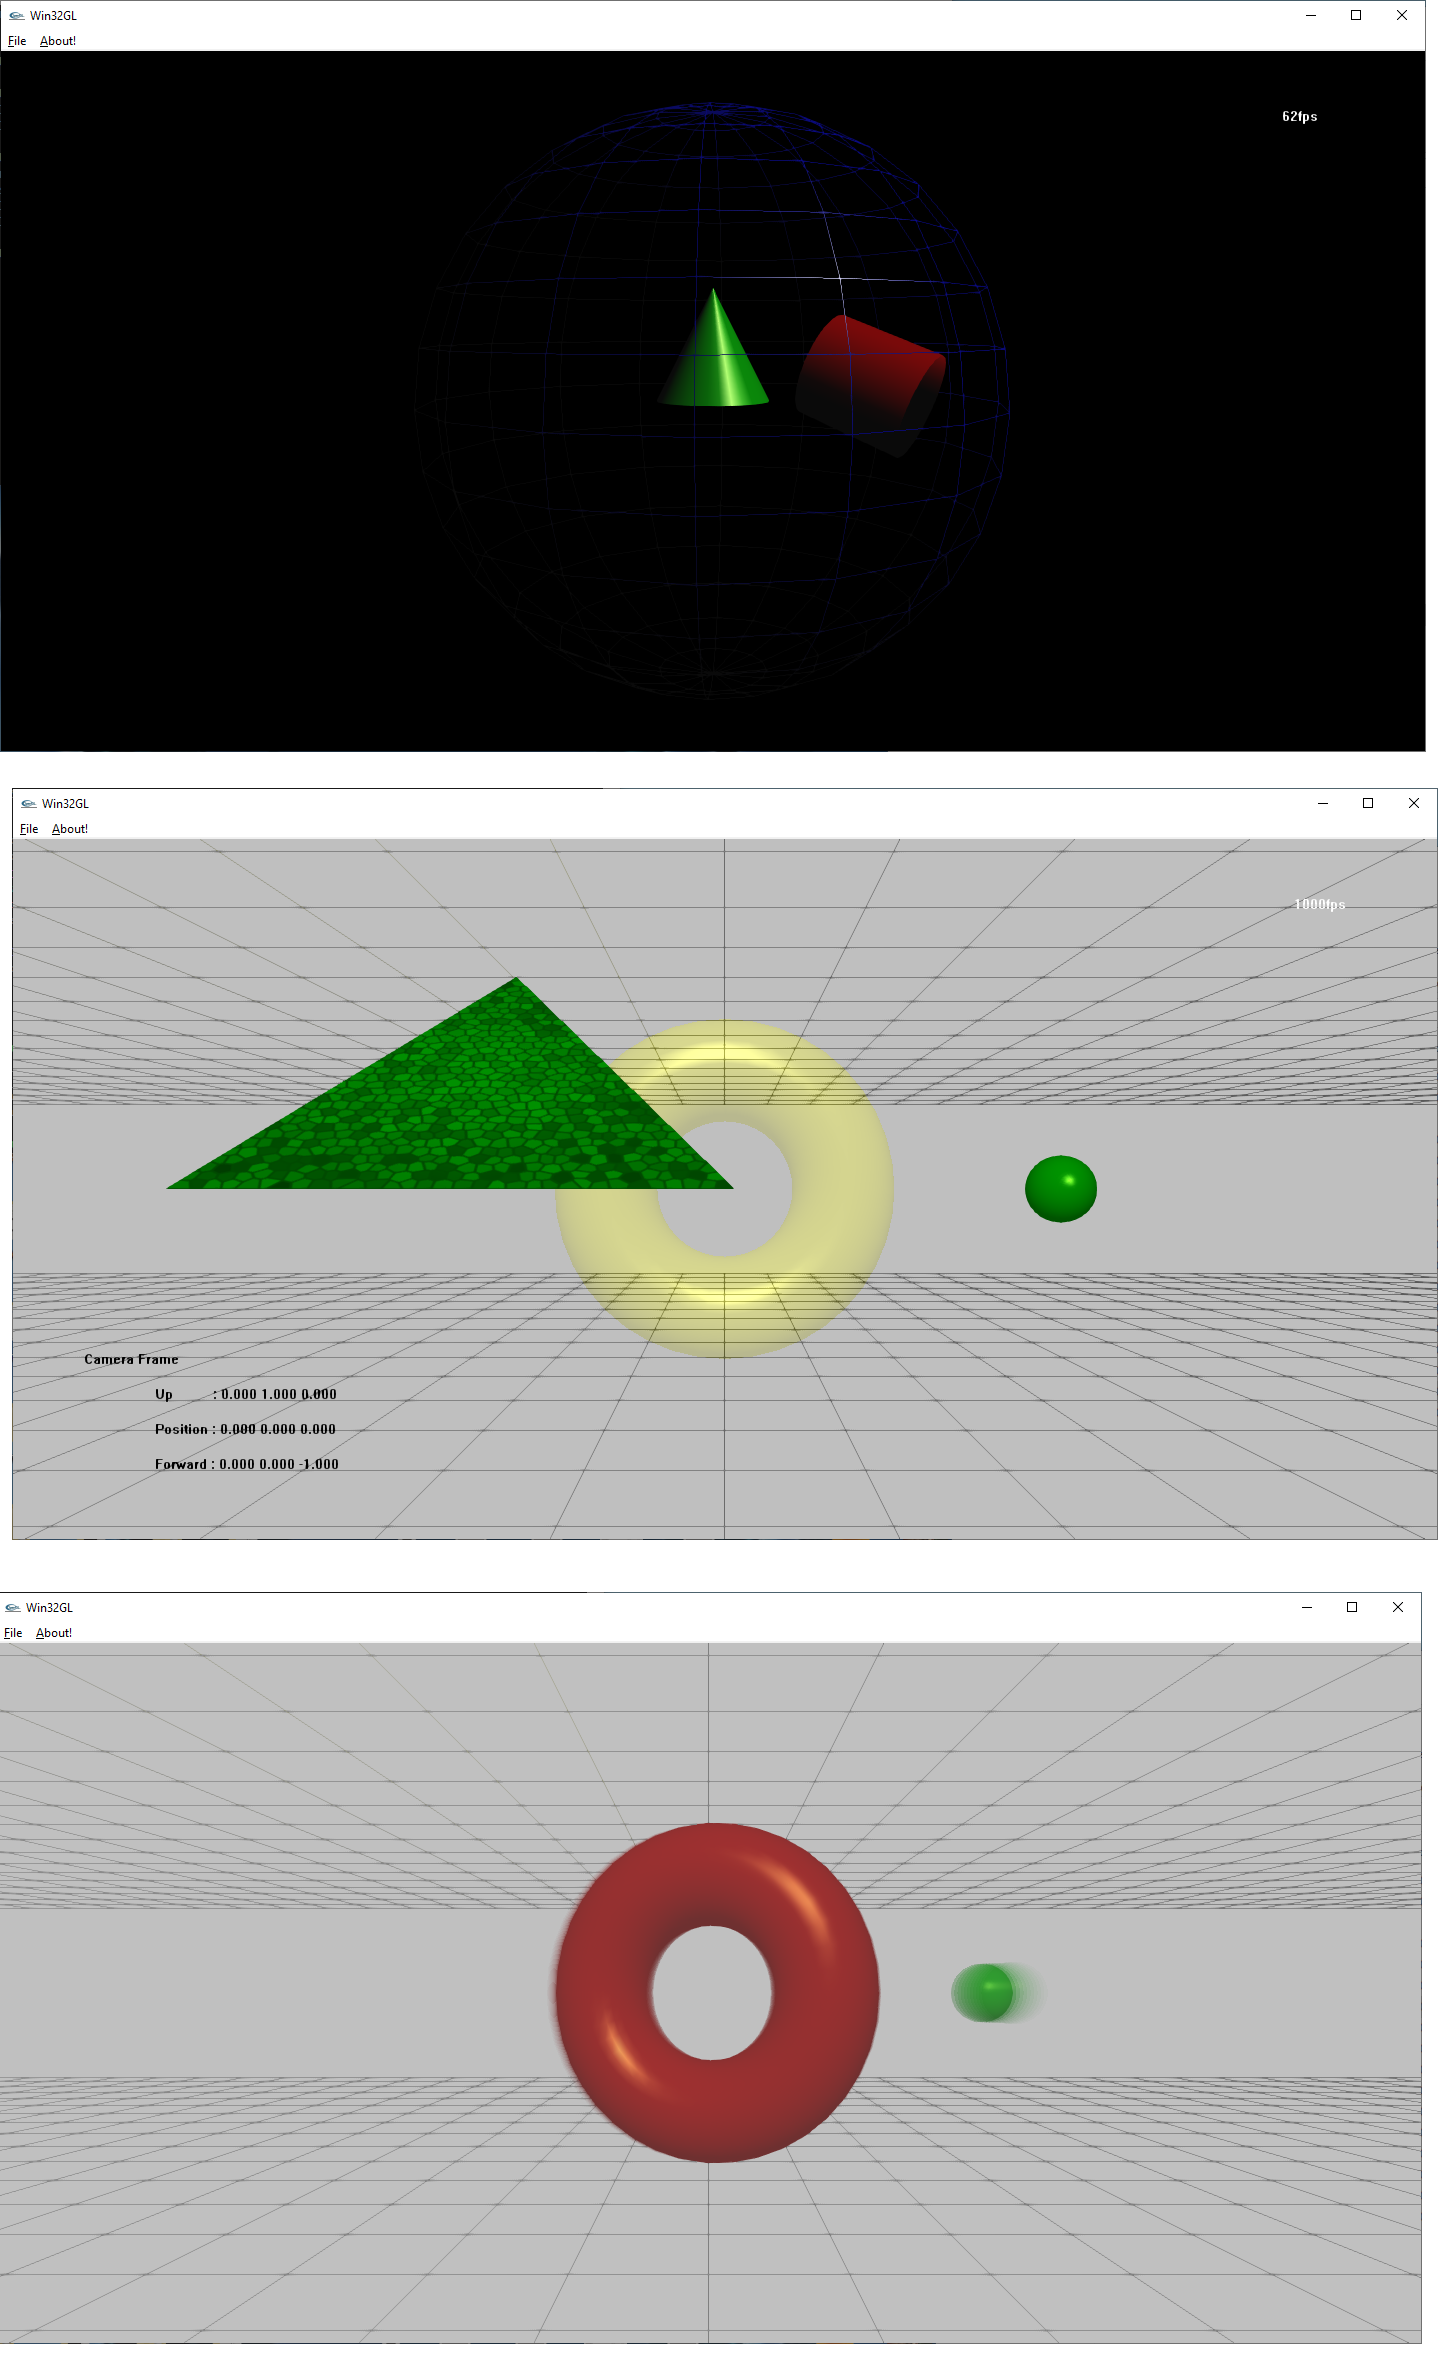
So, in digging up old code, these three images are from very early fixed function OpenGL messing about I did. I learned the WinApi/MFC when I was in highschool (read petzolds books over the summers) before college and eventually made the hacked version of AUXDEMO.C from an old MSDN reference page. The next two are *much* later in terms of timeline (after OpenGL Superbible 3rd edition was released) and are variations of sphereworld from the book with basic camera movement (forward back, left right, just basic horizontal rotation as 3d rotation without gimbal lock wasn't really easy for an 18 year old me (as you'll notice in the physx example) Last image is motion blur using the Accumulation Buffer, which I really never liked because you have to render the motion blur "backwards" if that makes sense. Timeline is probably sometime between 2002-2004 Win32GL.zip Win32GL2.zip
44 / 54
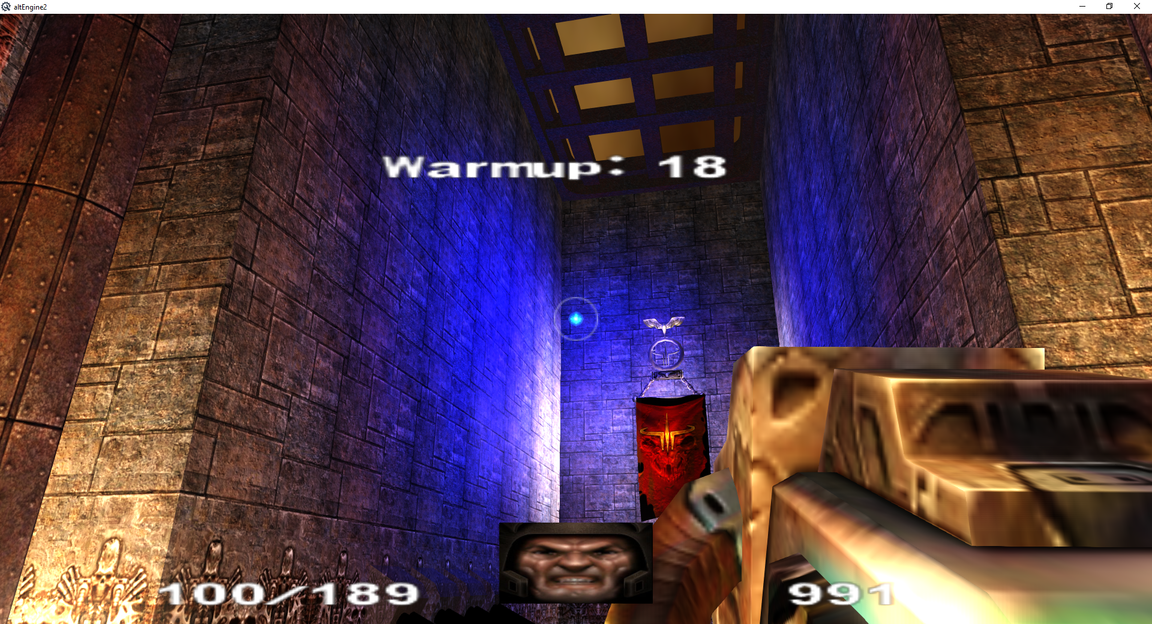
Figure I should add a screen shot of dynamic lighting in engine, light values probably need to be toned down a bit and some global shadows would make things cooler, but dynamic lighting really adds a nice wow factor to things, when shadow mapping is enabled I really like seeing my own shadow too when walking about.
45 / 54
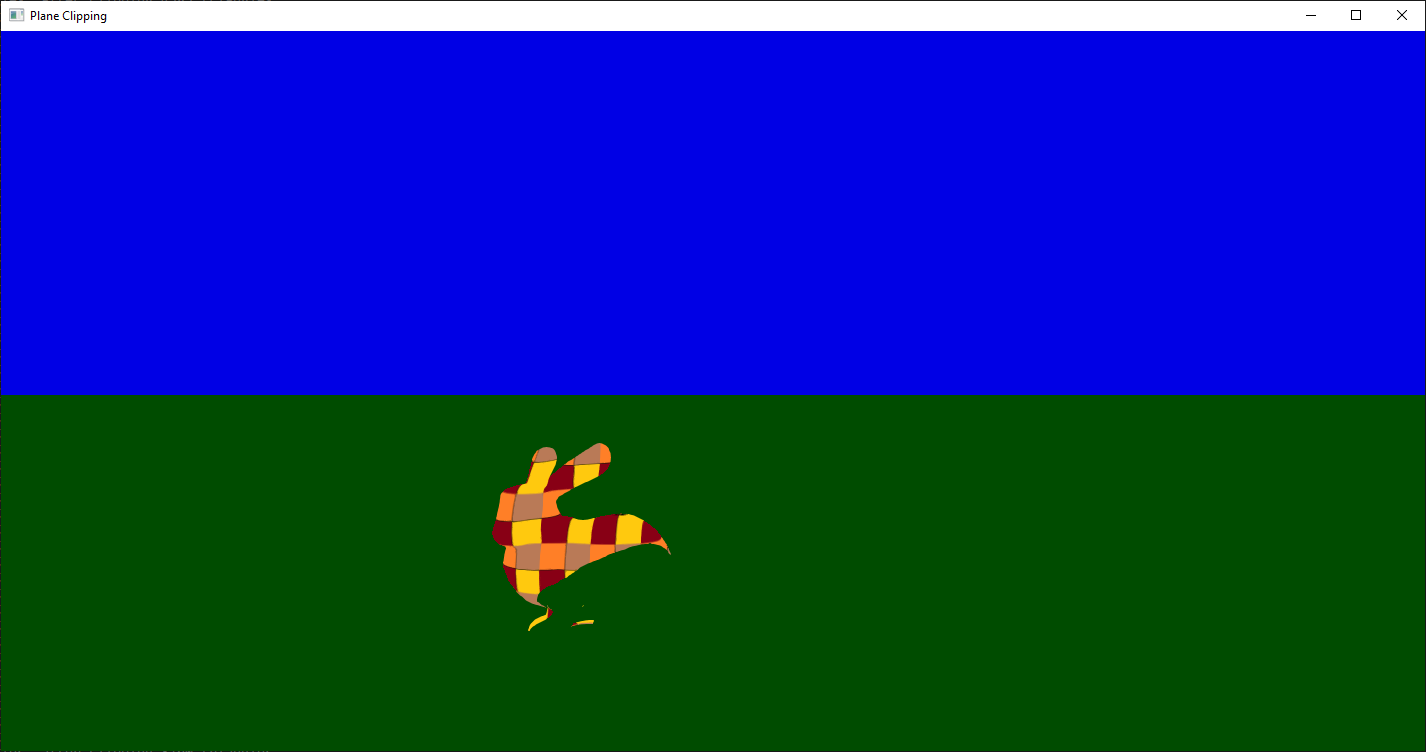
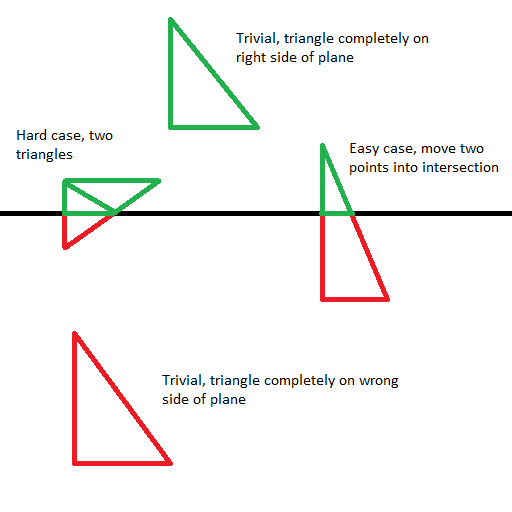
So, my software rasterizer was dropping some triangles every now and again, and I thought to myself, it must be my near plane clipping algorithm. So, while it wasnt perfect and did have some issues, I'm not sure it actually fixed the problem I was having. Those triangles must be getting dropped in some other fashion. Anyway, here is a 3d triangle / plane clipping algorithm. Essentially intersects a plane and the edges of a triangle. Easy case just moves the two 'outside' points to the intersect point. Hard case chops the tip of the triangle off resulting in two triangles. Other cases of all points being in is trivial (keep it unchanged), as well as all points being out (drop the triangle completely). Most clipping algorithms run on all edges and output polygons, which then need to be triangulated. I prefer this approach that outputs zero, one, or two triangles for each input triangle. It clips the stanford bunny with a rotating plane, the algorithm can be sped up by removing the excessive checks I have for error conditions. (eg: clipped triangles should have less area, do some area checks to ensure input triangle windings match output triangle windings) Poor illustration of the cases here. Except each easy / hard case really has three branches, one for each edge. Sounds trivial, but really is a pain to get things working right.
46 / 54
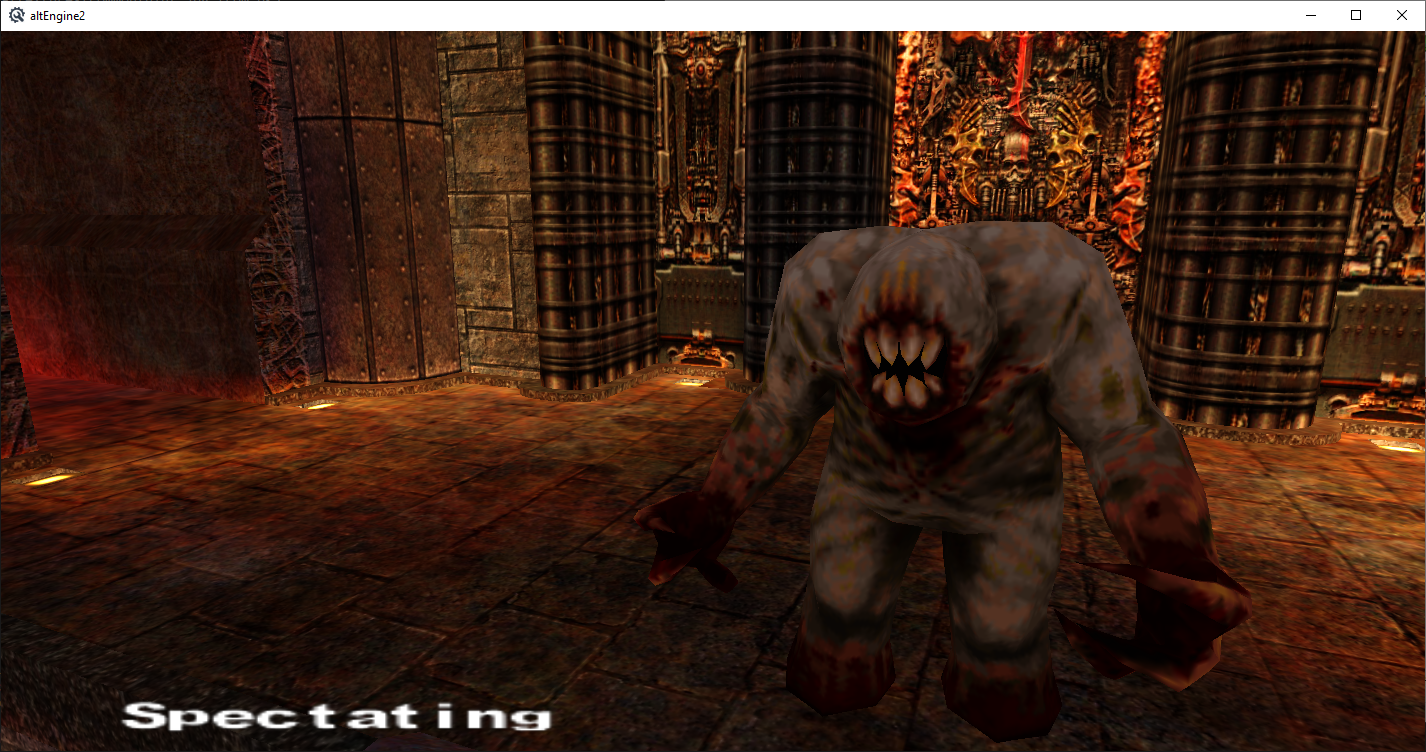
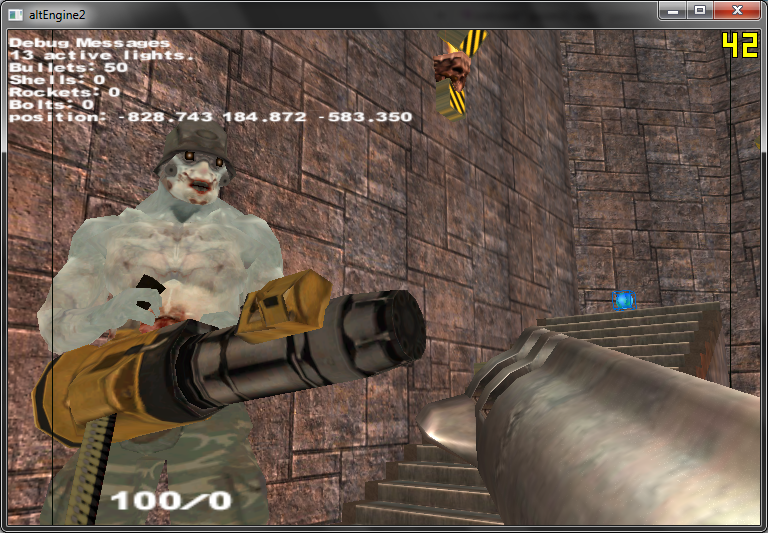
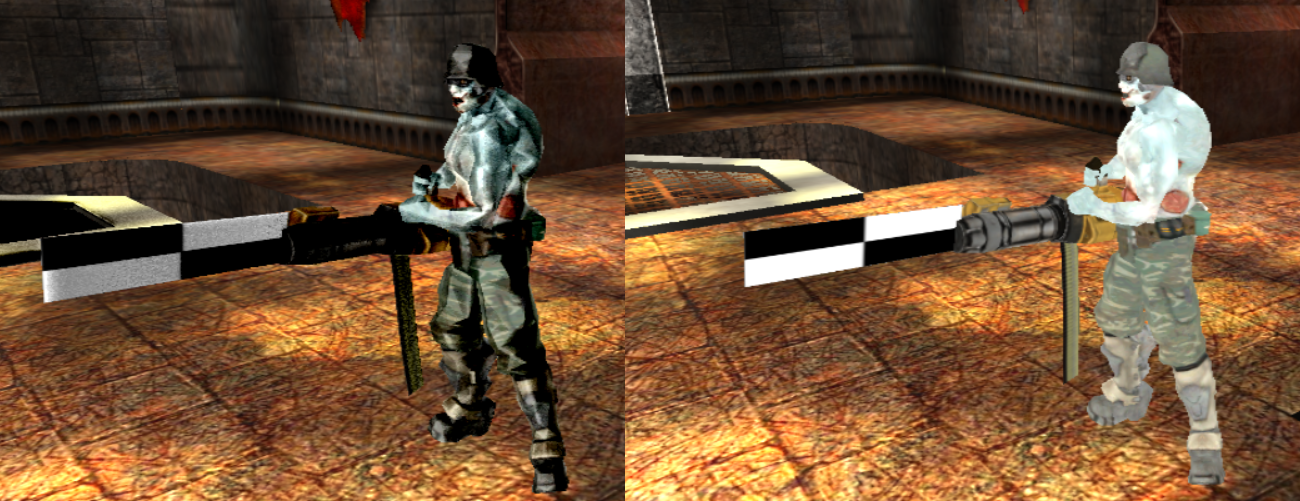
Just the shambler from the quake remaster in engine, it's a MD5 model, and I can already load MD5 files, so super easy to add really. Although the quake remaster uses a single md5anim file with multiple animations being frames within the single anim file versus multiple md5anim files for each animation. I put the ranger/quakeguy to replace the Doom3 ZCC chaingun guy as the player model now and he has better animations for my purposes (shoot, run, pain, death, etc) I'll probably add the monsters and make monster AI next. The bot AI I have right now is more of a deathmatch style bot than a single player slow moving monster.
47 / 54
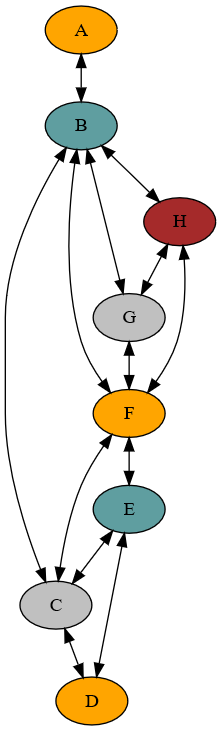
This is just the output of a graph coloring algorithm, the graph is output as ascii text using the dot format and rendered with graphviz. Which is awesome if you need to draw graphs or binary trees. Also, plantUML is good for making UML diagrams like sequence diagrams using markup instead of drawing things. (I prefer markup languages as opposed to moving around rectangles and ovals in word or visio personally). But anyway, I started a master's degree and the algorithms class has a project that involved generating graph colorings using smallest last vertex orderings. Essentially the output of the smallest last vertex algorithm is the order in which you color the graph. To generate the ordering you remove vertices from the graph in smallest degree order. Where degree is the number of edges the node has. For this graph a greedy algorithm that just goes in order generated a similar coloring using the same number of colors. But supposedly the smallest last vertex ordering yields a more optimal coloring. Practical applications of graph coloring are things like register allocation in an compiler, or scheduling. A graph coloring comes from the idea when coloring a map, say states in the US, you don't want two colors to be the same between any two states and you want to do so using the fewest number of colors (or else just use 50 colors for 50 states)
48 / 54
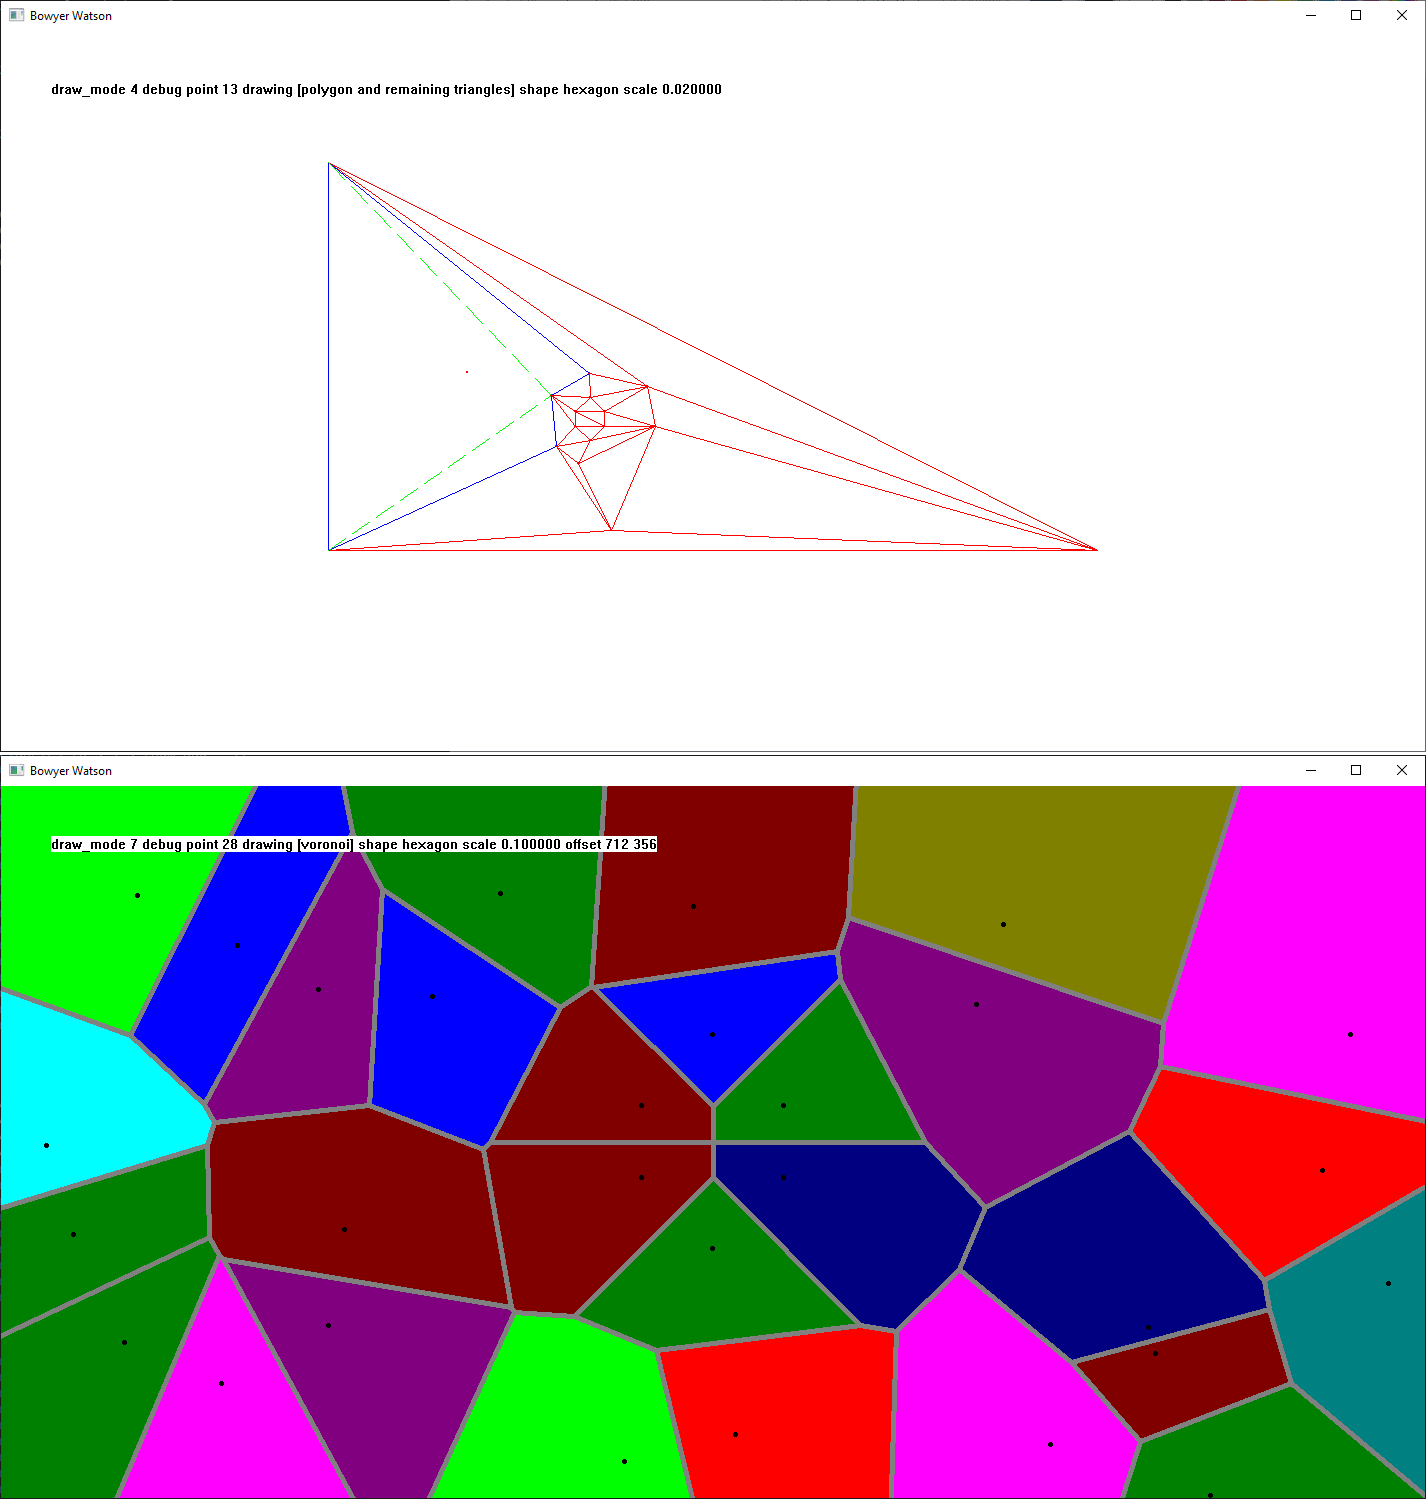
So, this is a test app for BowyerWatson Triangulation, BowyerWatson being the names of two people who discovered/published the algorithm independently at the same time. This implements triangulation using Delaunay Triangles. Triangulation just means take a set of points and turn them into triangles, and these will only work on points in a plane, so it wont do a 3d mesh all at once. Anyway, a Delaunay triangle is a triangle where no other points exist in it's circum-circle. Which is the circle that passes through all three of a triangles points. This property leads to a good triangulation as it will favor larger triangles over thinner slimmer ones. Delaunay triangles are also the dual of Voronoi Diagrams, where the vertices are the points and the edge midpoints are on the cell line that bisects the space between two cells. The algorithm starts with making a "super triangle" that contains all the points. It then adds points one at a time, deleting triangles that violate the Delaunay property and recreating them from the polygonal hole formed by their deletion. Special care must be taken with interior shared edges as they should not be part of the subsequent triangulation. This is pretty complicated really, and probably overkill for what I needed it for, which was triangulating the BSP Brush volumes from a .map file one plane at a time. My original solution was like 95% there, so I figured this would fix everything, but sadly I think the issue was with point generation and not the triangulation really. But the .map to triangles app will probably be here next.
Oh yeah, keys, pgup/pgdown changes the draw mode. left/right adds/removes points from the shape. Up/down changes the shape from a few pre-defined ones and a random one. Space will add a point at any time at the mouse position. Enter will clear the points. Mouse wheel can zoom (two finger touchpad up/down for a laptop). Clicking and dragging will Pan the view. The code is essentially what's listed under the wikipedia BowyerWatson pseudo code listing, I just took that and made it real code for the most part not knowing much if anything about Delaunay triangles or Voronoi diagrams prior to that. Here's a good explanation video about those in general, but not necessarily about Bowyer Watson. Video one thing that seemed awesome, but not intuitive to me, was that for the 3d case of Vornoi diagrams, the convex hull will be the points that extend to infinity on the exterior. So if you did a proper 3d Vornoi / Delaunay I think you could triangulate an entire mesh. Keep that in mind for a rainy day.
49 / 54
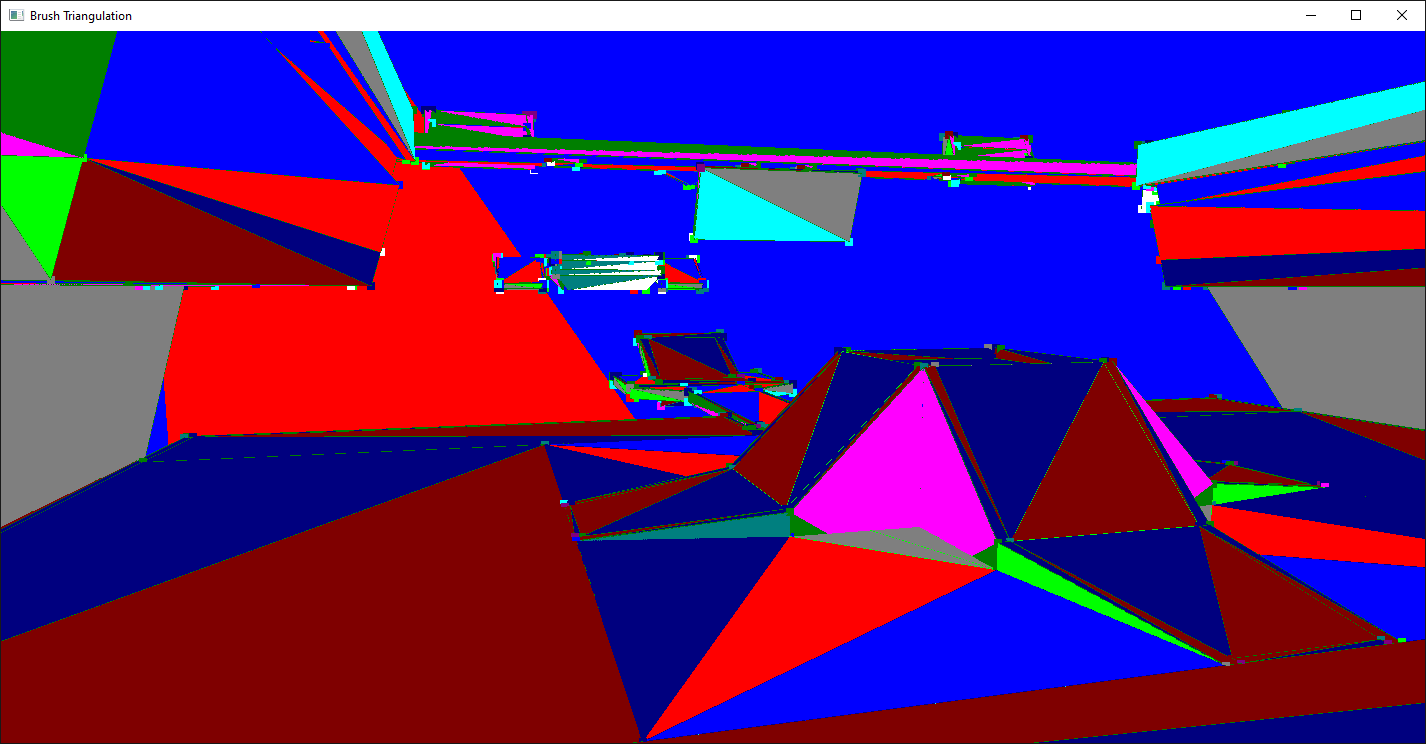
So this is the Brush Triangulation code. So, you might be wondering, what is a Brush? Well, in terms of quake engine games, a brush is a 3d convex volume defined by a set of planes. So something like a box would have 6 planes: top, bottom, and four sides. You can really represent any triangular mesh with this definition, so instead of using points ordered to form triangles, you can use planes defined by the triangle's normal. Not saying it's a great idea, but you could. Anyway, so with Binary Space Partitioning, it's much easier to divide space if your entire space is defined by planes instead of triangles. Splitting a 3d cube with 6 planes in half, you would add the splitter plane facing each direction to the brushes plane definition, removing the plane you made obsolete and you are done. No need to worry about clipping triangles. This is also beneficial for Constructive Solid Geometry, which is a fancy way to say you support Union, Intersection, and Subtraction operations. Anyway, if your 3d space is defined by planes, and not triangles, eventually you have to convert those planes into triangles for rendering. That's what this application does. It loads a q3 formatted .map file as defined by the GTK Radiant / QE Radiant editor and intersects each set of three planes together to form points. Eventually you have a set of points on a plane that requires triangulation. These can typically be rendered as a "Triangle Fan", but that also assumes your points are ordered clockwise or counterclockwise. Which isn't always the case. Sounds simple, but given a set of planes determining all unique pairs of three is a bit complicated as you need to implement N Choose R from probability/statistics that lists all the output, which turns out to be a recursive function and one of those things that sounds easy, but really isnt. Another thing you can do is define a extremely large cube, and then use a 3d clipping plane for each plane leaving you with your remaining triangulation. But clipping something by more than one plane becomes a mess data structure wise as you have output feeding back into input and one triangle can become 50 rather quickly. This same code should also work for quake 1 .map files and Doom3 .map files with a little tweaking to the .map file parser. I'll probably load those eventually as well, but I just started with quake3 initially. One thing worth mentioning is that with Binary Space Partitioning, all of the planes are brush faces. (some get split obviously) This is a misconception I've had for a long time as a lot of binary space partitioning literature will choose planes arbitrarily. Once all the planes are used, you have a convex set of three dimensional cells that can be ordered front-to-back or back-to-front as you step through the tree. Brushes are also useful for collision detection, as you can just say am I inside this brush? If the answer is yes, then you do a bunch of point to plane distance checks and can fix the collision. Obviously the more brushes you have, the longer it takes to answer that question, but with Binary Space Partitioning you greatly limit the number of brushes you have to check to only those in your current cell. You also have the benefit of accessing brushes in your Potentially Visible Set, which is the set of BSP cells/leafs you can see from your current cell. In quake3 this was pre-calculated using the BSP information, but you can also do it at runtime as the "portals" between cells (think of them like gates) can determine visibility from the eye perspective by simply checking if two "gates" overlap in two-dimensional clip space. Which is what they moved to for Doom3. I prefer the pre-computation though as anything that removes check's at runtime is a win in my book.
-- Made a slight update for quake1 maps to load. (quake2 maps seem to work also) Doom3 changed the format a bit, so I dont want to do "if (doom3)" everywhere on this sample, so I might make a doom3 specific loader later or something. You can get Quake1 .map files from John Romero's website, just google quake 1 map sources they are all there.
-- I got Doom3 maps loading also, just made a separate function, not sure if it's perfect yet, but it looks good so far. Quake4 and Rage are the only things left really. Quake4 being nearly identical to Doom3 from the .map perspective. Rage added a lot of nesting, but still used brushes. I think Doom 2016 ditched BSP completely for Umbra occlusion queries (waste of money imho)
-- Got Quake4 .maps to load, minor tweak from Doom3 really
-- Made a quick and dirty loader for rage maps, not a good parser, but it will load them
-- BrushStencilShadow.zip -- Added stencil shadows for the fun of it, I changed it to delete brushes with the word "sky" or "skies" to let the light in if that makes sense, there is z-fighting on some coincident surfaces though
50 / 54
So this is really a re-organization, had this kind of attached to my line of sight page, but it really was just kind of stuck on and out of place, so I figure move it here. I'll leave it there too for now, it's kind of stuck to altEngine 1's entry.
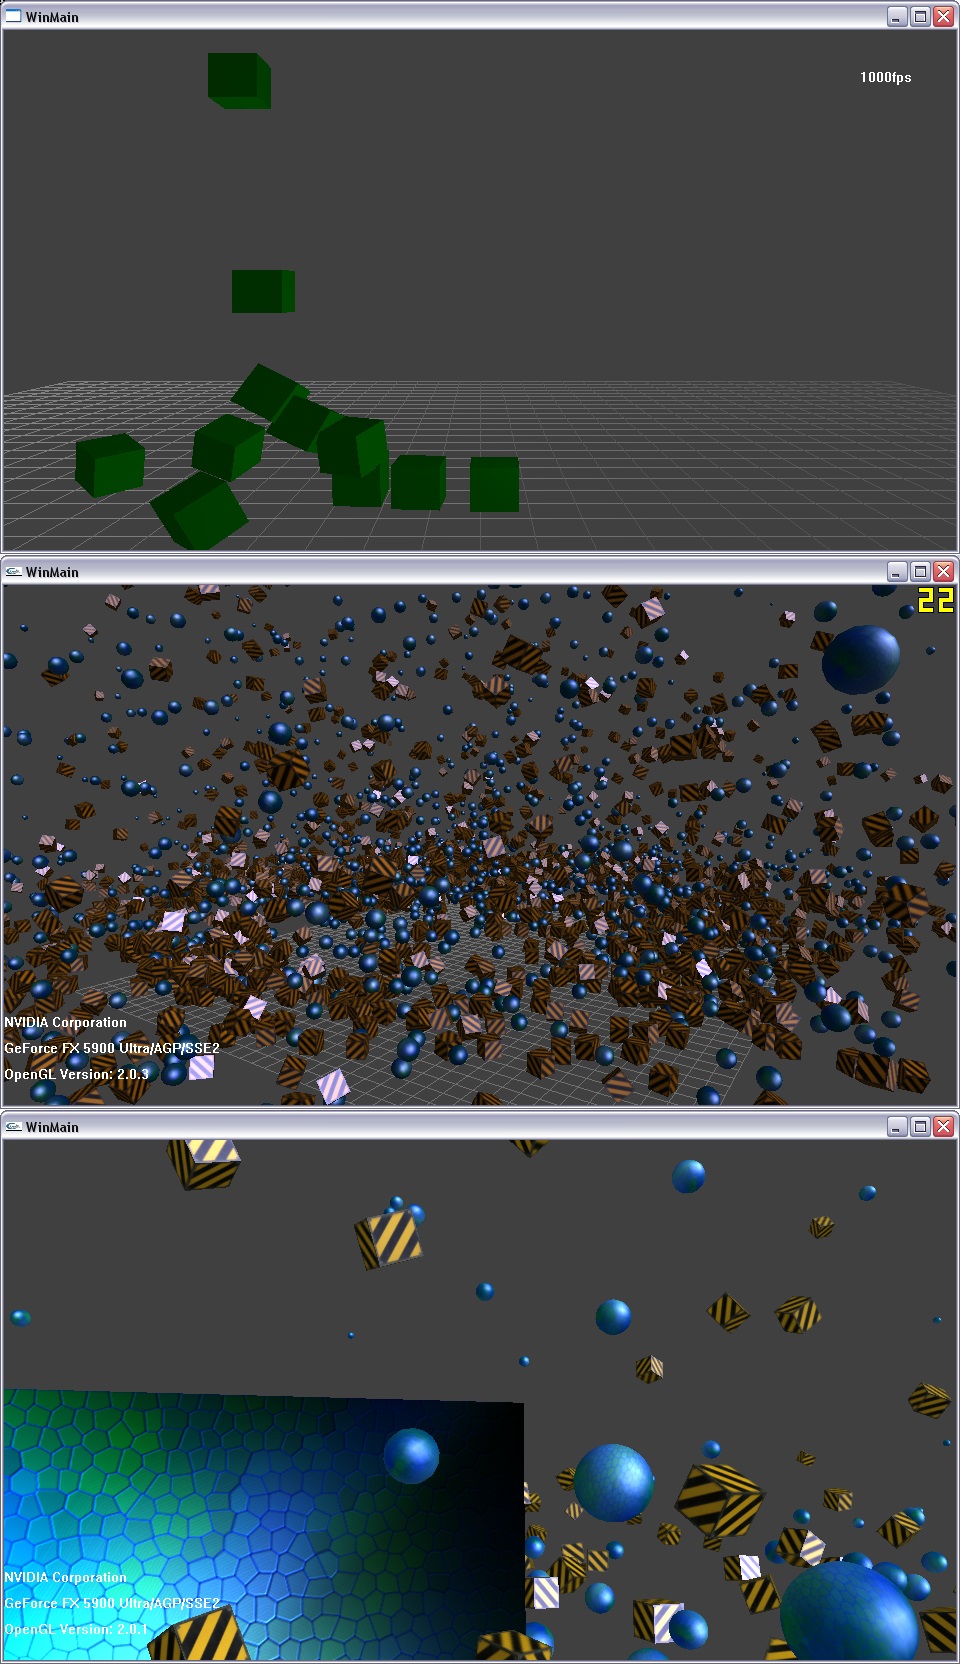
physx.zip -- This is some old OpenGL code from 2004 or so, back from the Ageia Physx days before they were acquired by Nvidia. It was really easy and quick to get a good rigid body simulation going, but this does require run time libraries to be installed. I still have the old PhysX 2.6.4 SDK installer, and I think I originally had a 2.4.4 SDK version which was one of the first, but I dont think I saved that one sadly. I was kind of thinking of adding Physx to the brush triangulation code, but needed to do some research on what that SDK has been up too recently. The latest version of Physx, Physx 5, is in Nvidia's "omniverse", that's weird and not github, turns out Omniverse is intended to be the TensorFlow of robotics/physical simulation. It looks like some sort of model editor with the ability to turn on simulation. So not really an API.
Looking at the video here, it really seems like they are stepping away from real time and towards advanced simulation. After a bit of googling it seems Pierre Terdiman and Adam Moravanszky were the main devs of the Novodex/Ageia code and you can tell from the 2.x SDK demo's that they knew what they were doing. Anyway, so I downloaded Physx 4 instead, which I forked on github a while ago, got things to compile and run, but I'm not 100% sure yet if it is the best way to go compared to the previous versions. Version 3.4 seems to be under a 3-Clause BSD license and supports Linux where 2.x was mostly windows. But 3.0 also rewrote a lot of things to make it multithreaded, which makes me worry a bit that they might have made it worse. If all else fails I know my old 2.6.4 SDK will still work, but the requirement to install a run time is a bit annoying. Maybe I can statically link so it does not need the run time DLL's or hack the loader DLL to bypass the install. Think I might stick my old SDK file on github for historical purposes, maybe some one will appreciate having that old SDK around.
-- Went ahead and uploaded the SDK and SystemSoftware to github, and I also found a newer 2.8.4.6 SDK that was from nvidia and added it there too. PhysX_2.6.4_SDK -- So if you download the runtime software install that, then the physx.zip, it should run. Warning though the mouse rotation is very wrong if you move away from the origin with the arrow keys or enter/shift. I think 3.X is probably the best for a game engine, 4.0 moved towards non-game simulation, but I'll probably use the latest 2.X release as it had some soft bodies that were removed in 3.0. The soft bodies are probably just cloth simulation with additional springs, but if you look at the SDK I uploaded the soft floppy cow was kind of fun.
So although the source code for the simulation for 2.X is not available, I dont think things changed much from the 3.X version in terms of rigid bodies, so I think you could piece it together. But if you are using a physic's middleware, you probably arent too interested in the details of the sweep algorithms. Physic's simulation can get pretty complicated, so if you want to roll your own physics past something basic you will be in for the long haul.
51 / 54
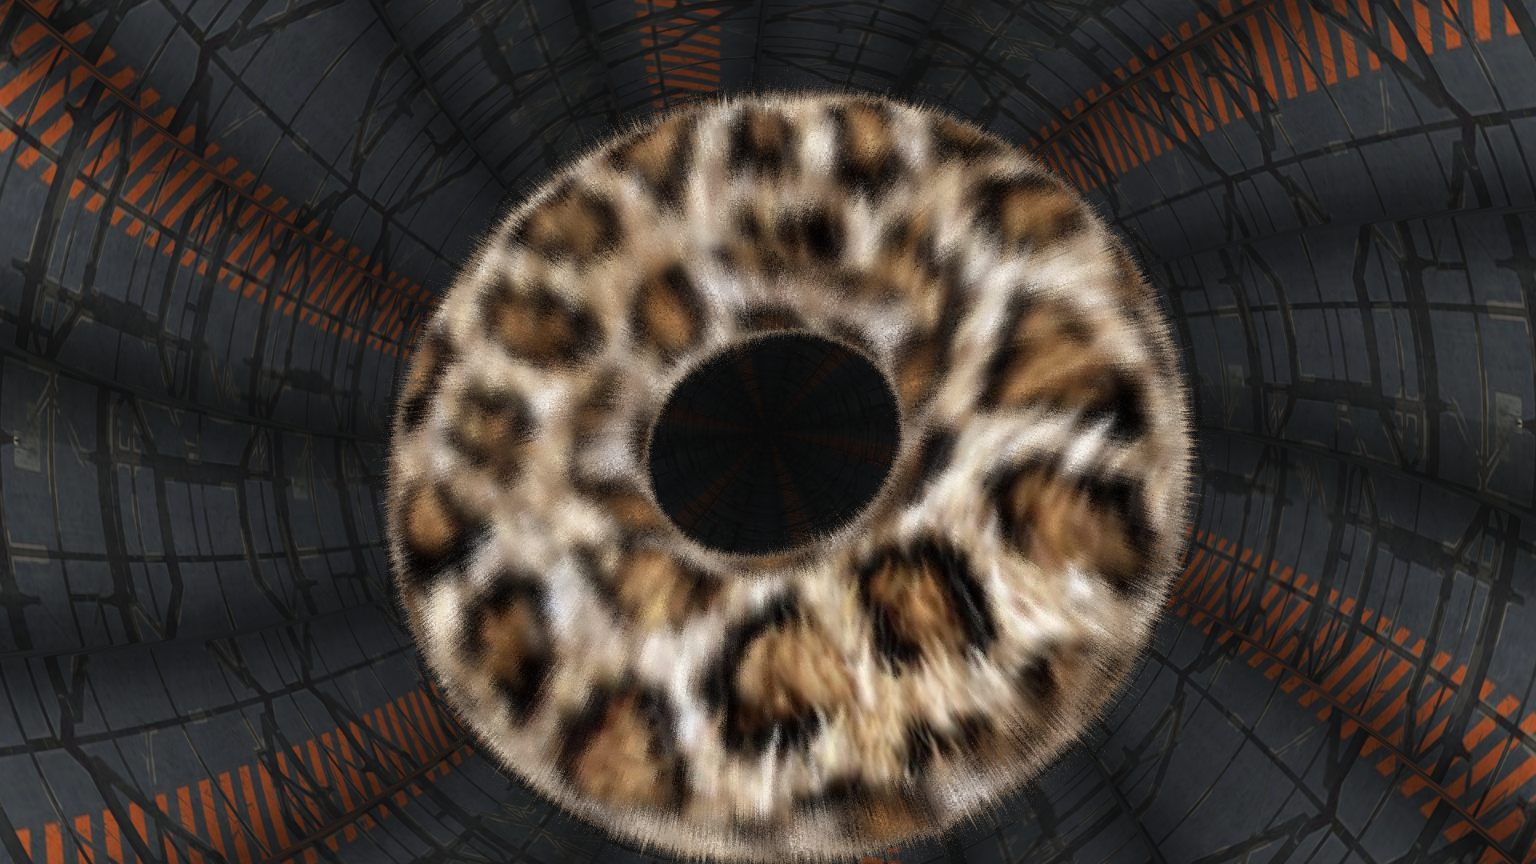
So, due to last minute scheduling issues I had to switch from an AI course to a computer graphics course. Which should be easy for me. Problem is, everything is in WebGL and javascript in this course. No big deal really, javascript is a bit different while OpenGL is still the same really. You can see a bunch of my assignments here in the CG directory. So, around the same time I stumbled into "Ray Marching", which uses the fragment shader to do ray tracing like rendering using signed distance functions. A sign distance function is essentially a function that when you give it a position it tells you how far away you are from something. So instead of calculating intersections against triangles, spheres, and boxes like in ray tracing, you have a function that gives you a distance and wait for it to approach zero. See this for a good introduction or maybe this one. Anyway, it's not too much trouble to connect shadertoy style shaders (where almost everything is ray marched) to webgl, or really even any application as you just need a few extra functions in your fragment shader and a few uniforms for time and resolution and such. This is a good reference for connecting shadertoy to webgl, but applies to real applications as well. The image is from a furmark style donut, that uses ray marching. Although there are tons of cool effects, the planet by reinder is very cool and combines multiple shadertoy entries. Reinder uses the Atmospheric Scattering by GLtracy in his demo which might even look better than O'Neils GPU Gems scattering, albeit they are probably both using the same code. Oh yeah, if you are interested in ray marching shapes other than cubes and spheres, check out Inigo's Primitives page which has quite a few different shapes (where each shape is defined by a different signed distance function, no vertices), the source code is also filled with interesting links for you to check out.
52 / 54
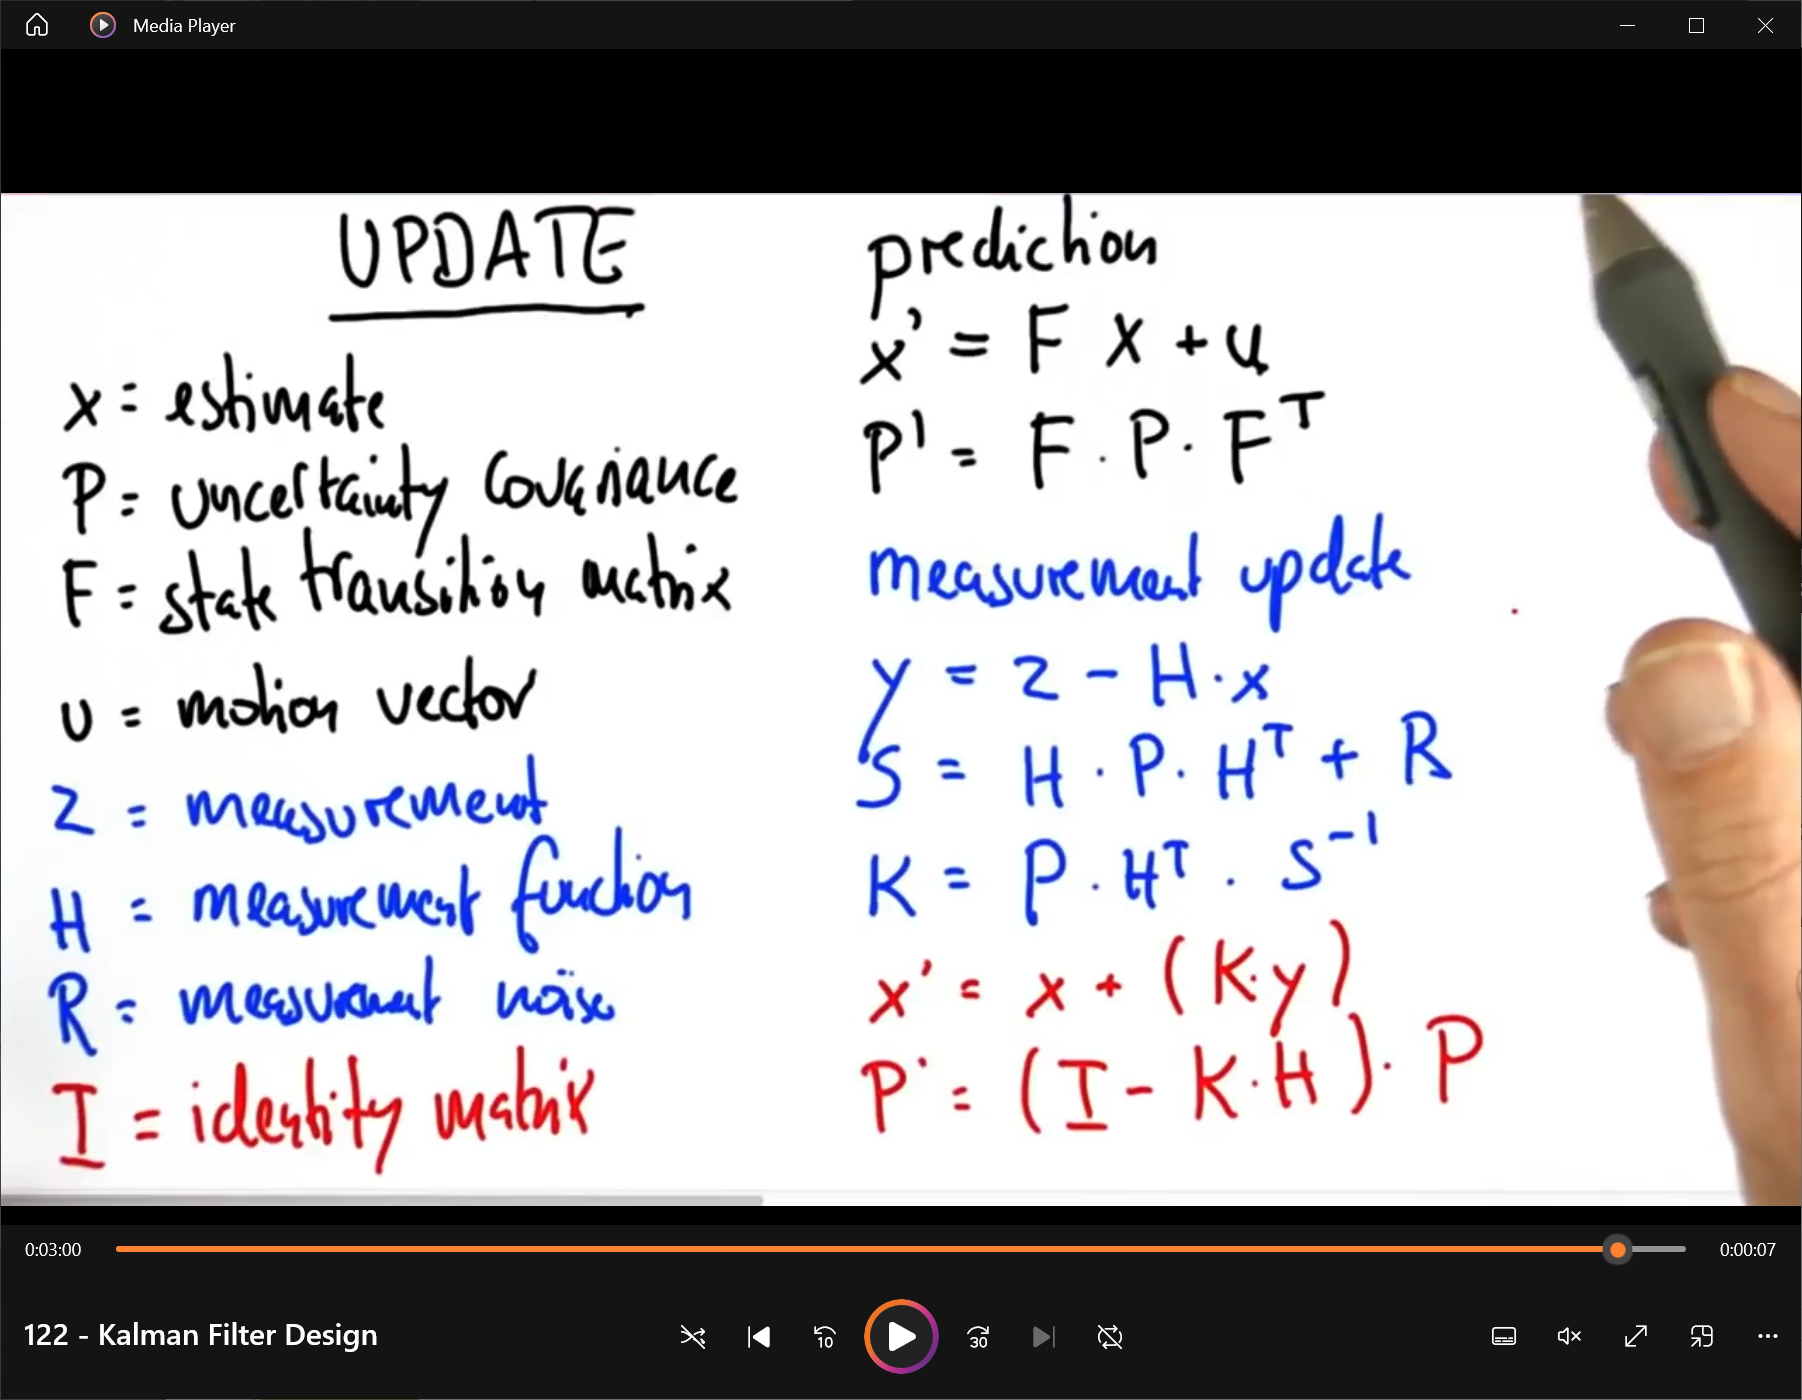
So, this is a screenshot of probably the most import part of a series from Dr. Sebastian Thurn on Kalman Filters from the OMSCS course. Hopefully they dont get too mad about a single screenshot, I had typed the same thing up in Latex, but liked the colors of the slide more to be honest. Anyway, Kalman filters are a bit nebulous because I find a lot of explanations of them aren't really correct. Lot's of people repeating what they've been told and losing information along the way (similar to how NeuralNetworks are often explained nowadays). Anyway, I was going to attempt to put a more detailed explanation here, but it really needs to be in a paper, so I threw the following together so far, [kalman.pdf] will likely update it over time. And it is pretty highly specific with tracking particle motion using kinematic equations. I do have Python code that implements the Kalman filter on a two dimensional tracking problem we used in the course using multiple methods (two one dimensional passes, a single two dimensional pass, and both variants of 3d tracking, but with Z terms set to zero as it is a two dimensional problem.) Anyway, Kalman filtering takes a measured state at time T and predicts the state at time T + 1 and is useful for a lot of applications. You can implement a Kalman filter using the above linear equations and modify the F "State Transition" matrix to track any number of variables. But in most explanations of the Kalman filter people don't really provide the whole picture and leave things in terms of X(t+1) = something*X(t) -- which is no where near enough information. Even Dr Thurn's explanation in the course focuses more on concepts and less on application details, this slide being a kind of "dont worry about understanding this" type of thing. But his course was originally targeted for Udacity and not really graduate students, so I think the explanation was tailored to make Udacity people feel smart while simultaneously not really challenging them mathematically.
I'll probably come back here and add an example using C++ of the various flavors I provided in the pdf file, but not sure I want to go to the trouble of generating a testing framework around it like the asteroid jumping example they provide in class. I would post the python code, but they use the same code every semester and have some policies against posting your solution implementation anywhere online to prevent people copy pasting solutions.
-- Also, you have to question if I'm being another one of those people I talked about providing second hand explanations ;o)
53 / 54
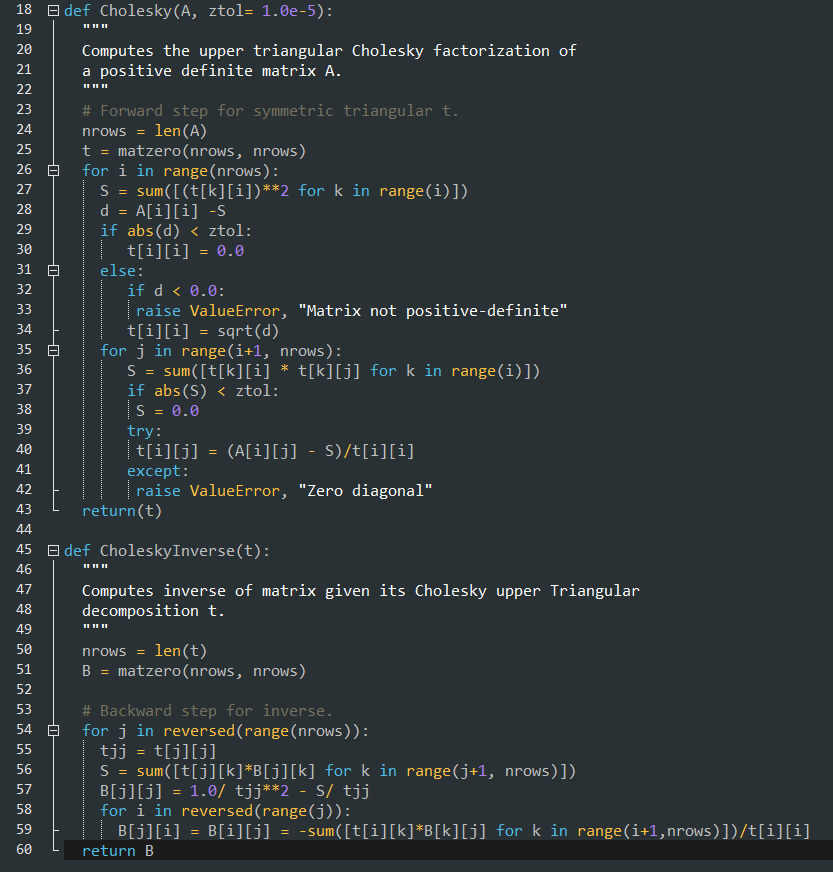
So, also related to the same class before, they had this python matrix class that had an inverse function. Typically when I would invert a matrix I would do the adjoint divided by the determinant, where the adjoint is the cofactor matrix. But this class used something called a Cholesky decomposition, which I have not heard of before. And I figured maybe other people haven't as well. Anyway, they pulled this code from a blog post by "Ernesto P. Adorio, Ph.D." And from the comments it looks like he got it from a numerical analysis book "The Cholesky code was based on some numerical analysis book most probably by Cheney or by Budden and Faires." In my Numerical Analysis course we used a book from Timothy Sauer and I dont believe that was mentioned, but it was a good course and book in my opinion. Anyway, here is a wayback machine link to the blog post. I'll do a beyond compare to what the latest version the course uses in a moment just as a sanity check for bugs from the original as well as make a C++ version of it just so I have multiple ways of calculating an inverse. But I figured I'd bring some attention to this alternative method of computing a matrix inverse. cholesky.py -- And since we are talking about numerical analysis I'll link my pollard rho factoring code here factor.c which can factor a prime number of any length (albeit it will take a long time) which uses the gnump library which if you understand encryption you know that it relies on factoring prime numbers being computationally expensive. Also some windows binaries, think these were intel specific and used mingw, but hopefully they still run. factor.zip
54 / 54
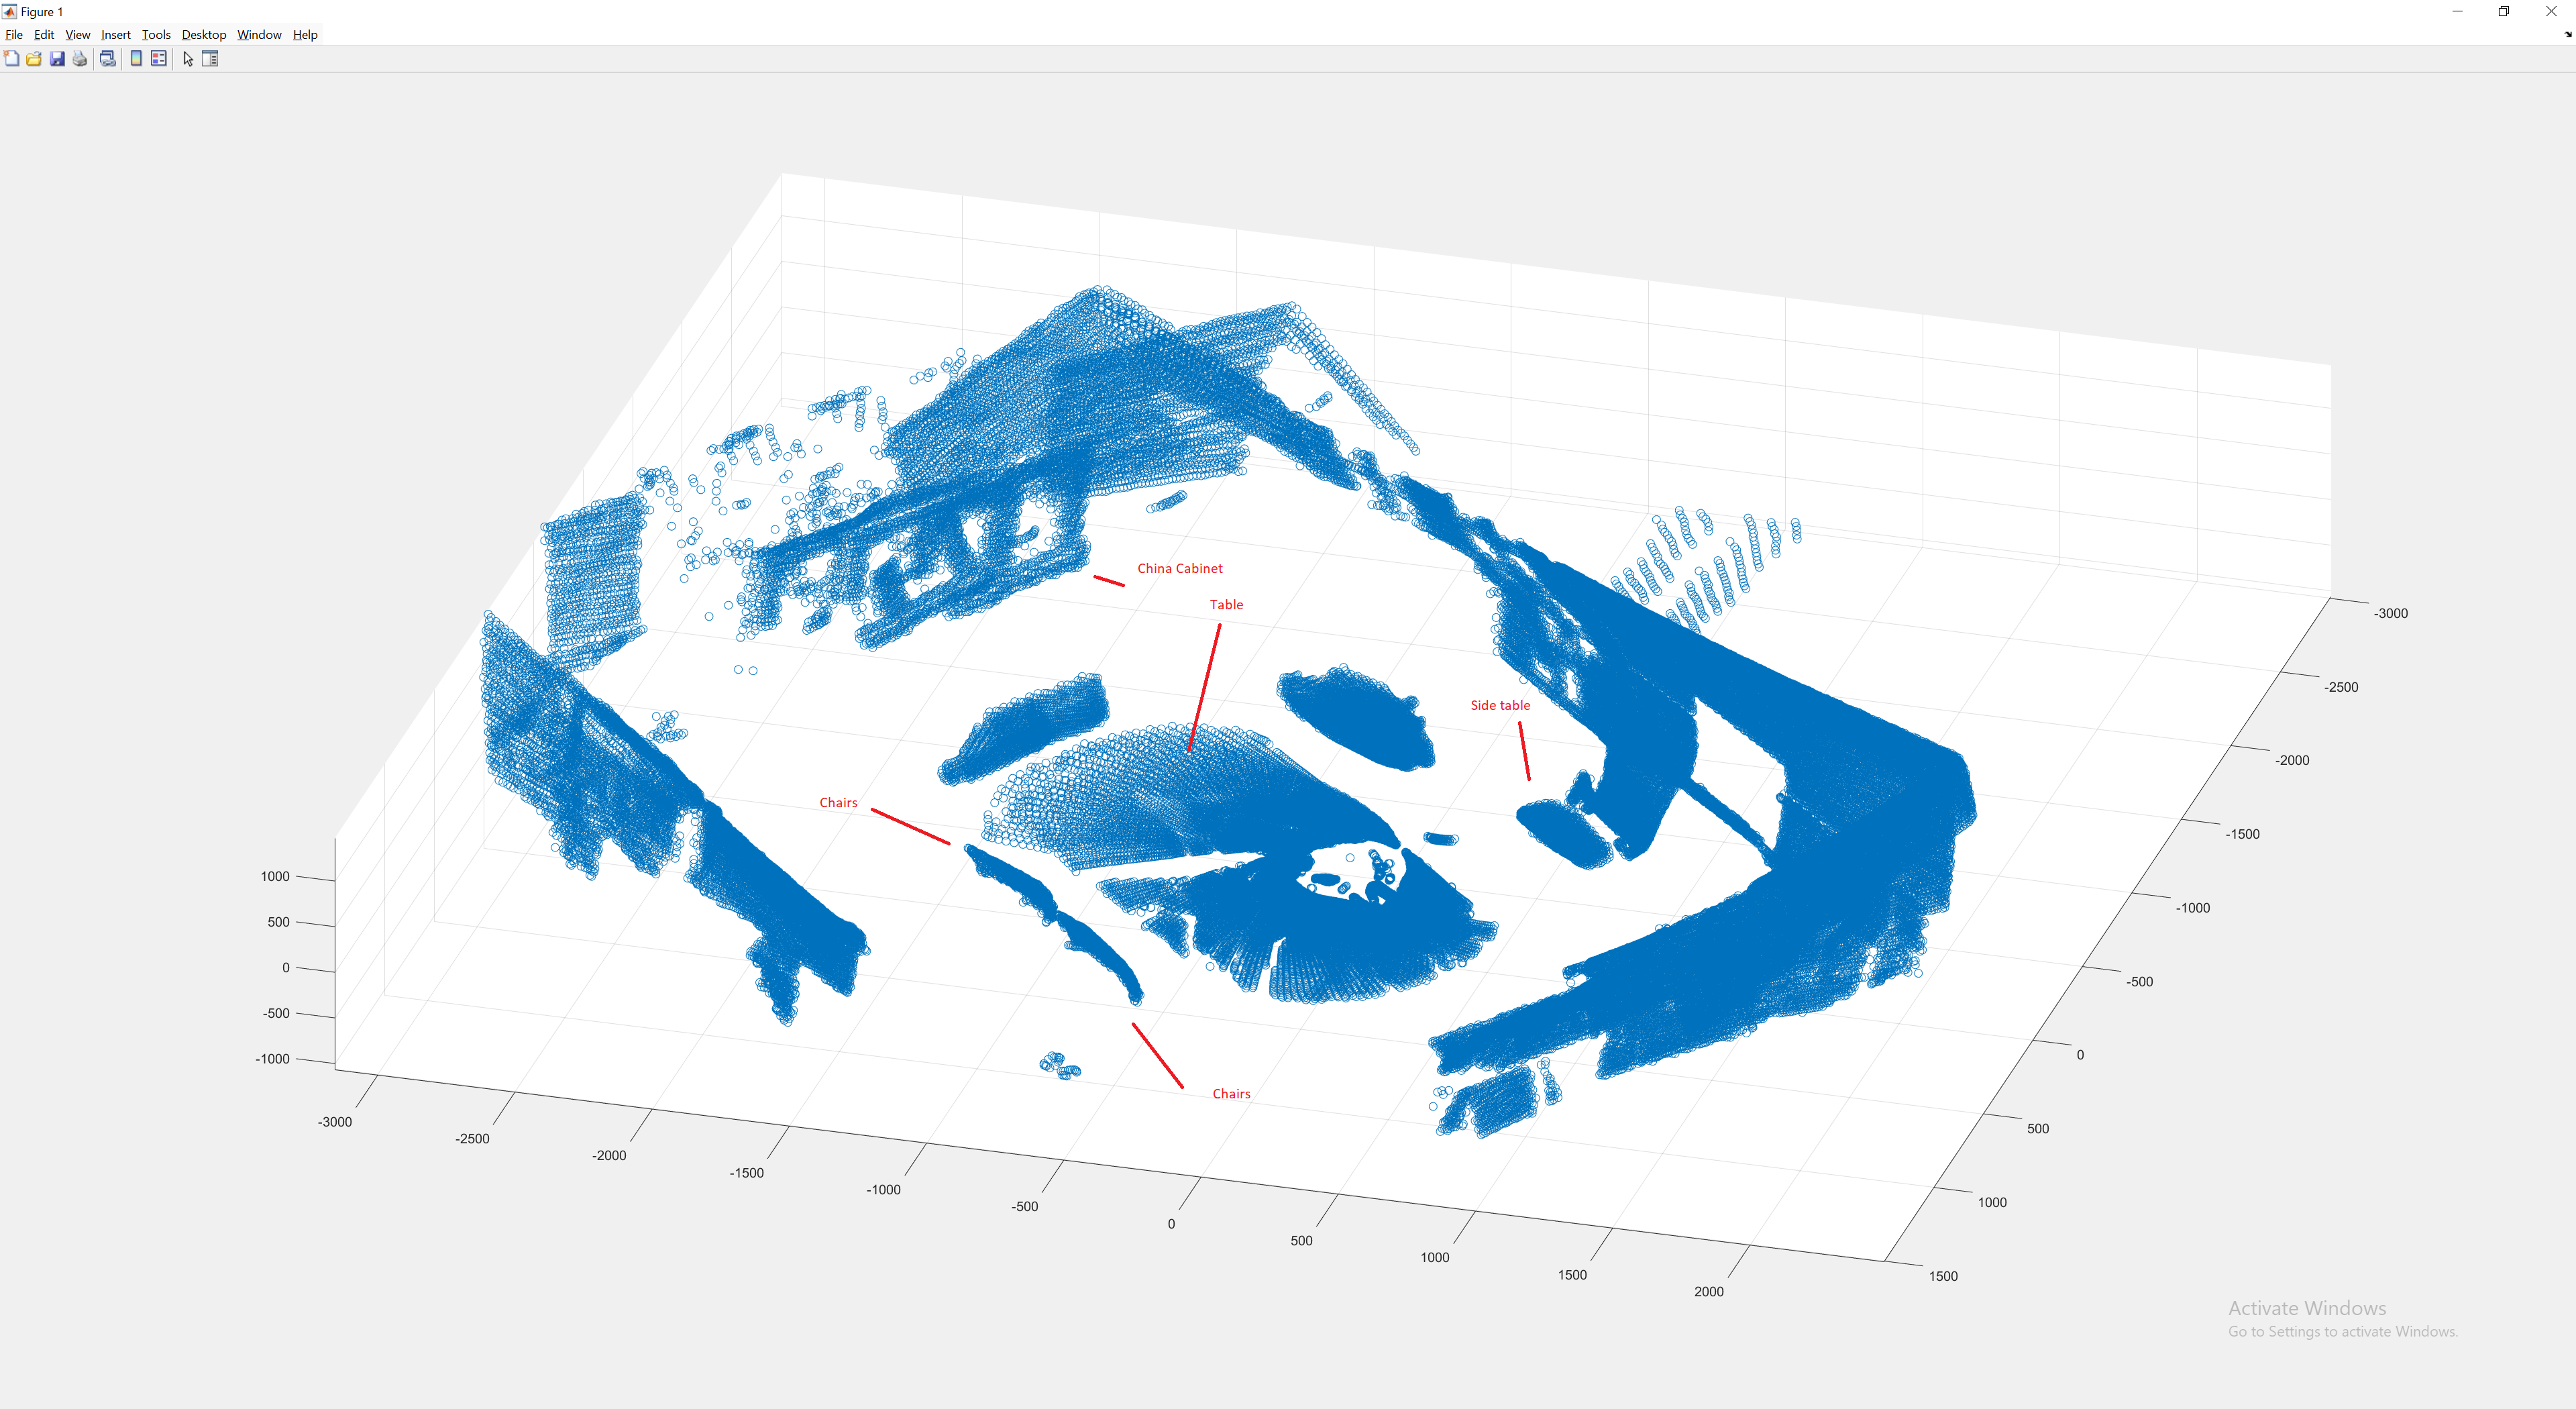
So, this is a 3d point cloud generated from a "Slamtec RPLIDAR A1" lidar scanner that I got from adafruit, we had "hardware challenges" to do as part of the RAIT/AI4R course at georgia tech,
and I thought it would be interesting to attempt to get a 3d scan from a 2D lidar mounted at 45 degrees. So essentially a small stepper motor (Mercury Motor SM-42BYG011-25) spun the lidar scanner using an Allegro A4988, and each step it collected a 2d scan.
A little data processing and you can extract a 3d point cloud. One challenge was that the cable from the scanner was causing a bit of drag on the stepper motor resulting in an incorrect rotation
(should be 1.8 degrees per step), so to fix that I mounted the laptop on a little camping table, and added a heavy C-Clamp to hold the stepper motor. The setup was pretty improvised using hot glue,
breadboards, 9v batteries, and an arduino. But the results were not too bad I think. Files are here, but not much explanation to them, but nothing too complex going on really. 3dLidar.zip